Introduction
![]()
airlock is a command-line tool that tries to make running AI agents inside
lightweight sandbox VMs so simple and smooth that there’s never a good reason
to run them on the host machine anymore. The main design principles are:
- No installation hassle — a single self-contained binary, installed with one command, no extra dependencies
- Lightweight and fast — the sandbox should feel like a normal terminal tool: boots in seconds, minimal virtualization overhead
- Project and tech stack agnostic — no assumptions about your tooling; flexible enough that everyone can tailor the sandbox to their needs
- Shareable — sandbox configuration lives in version control and can be shared across a team or company

Motivation
tl;dr I kept running into the same problem: AI agents need broad access to do their job, but that broad access is exactly what makes them dangerous in a work context. Denylists don’t scale. Allowlists inside a throwaway VM do.
Working with AI agents at work requires extra care not to expose company secrets. With agentic coding, the risk is especially high — agents have access to the entire host machine and typically execute tasks semi-autonomously. They don’t usually do anything dangerous, but sometimes they access sensitive data by accident while trying to fulfil a prompt, and once that happens, the damage is already done.
Many AI agents already provide sandboxing capabilities, but I’ve noticed that normal development tools require surprisingly wide filesystem access to work properly — caches, registries, config files, credential stores. That’s why instead of granting access to specific resources, people end up trying to deny access to non-allowed ones (like secrets). From a security perspective, this is a nightmare: in any larger group there’s always someone who stores secrets in a different place, rendering global deny-based policies basically useless.
The thing is, the actual secrets that a project and its AI agent truly need are very few. I’ve found it’s far easier and safer to build a sandbox that exposes only those few secrets explicitly and lets the agent roam freely inside. With a microVM, the agent and its tools get full access to the VM’s resources, so most things work out of the box. And because the blast radius is limited to the VM boundary, the worst an agent can do is destroy the VM and the mounted project files — both easily recoverable by re-creating the VM and cloning from remote.
Of course, the agent can still leak project files over the network through malicious prompt injections. That’s why VM network traffic must be fully controllable: some hosts can always be trusted, sometimes you want to run manual steps inside the VM (like installing dependencies) that are safe, sometimes the agent makes a legitimate request but you want to approve it first — the use cases are countless. The system needs to adapt and make enforcing strict network policies as simple and effortless as possible, so that even the laziest of us actually follow them.
Features
VM-isolated sandboxes from any Linux OCI image
airlock boots a lightweight Linux VM using Apple Virtualization on macOS or Cloud Hypervisor + KVM on Linux. The VM kernel and initramfs are embedded in the binary — there’s nothing else to install.
Before booting the VM, airlock pulls an OCI image (from a registry or local Docker daemon), shares its layers into the VM via VirtioFS, and assembles an overlayfs root filesystem inside the guest. The image can be anything: Ubuntu, Alpine, Fedora, a custom CI image — if it runs on Linux, it works.
- Pull images from any reachable OCI registry (authentication supported via the built-in vault backed by the system keyring) — no Docker required
- Or use images from a local Docker daemon if you have one
- Selectively expose host environment variables into the VM
- Share host directories via fast VirtioFS mounts (bidirectional sync, read-only option available)
- Near-native speed ext4 block device for persistent VM state (installed
packages, caches like
node_modulesor~/.cargo/registry)
Full network control
The VM has no network interfaces of its own. All ingress and egress traffic flows through a vsock RPC channel back to the host, where airlock enforces network policies. This isn’t just an HTTP proxy — it’s full TCP traffic control.
- Configurable allow/deny rules with wildcard host and port matching
- Transparent TLS interception (MITM) for rules with Lua middleware — a per-project root CA is generated automatically and installed into the VM’s system certificate store
- Lua-scriptable HTTP request and response modification (inject headers, rewrite requests, conditionally deny)
- HTTP/2 and ALPN support
- Internal DNS that maps SNI hostnames for TLS termination
- Transparent host port and Unix socket forwarding into the VM
Configuration as code
Sandbox configuration lives in a plain airlock.toml at the project root.
Check it into version control, and every team member gets the same sandbox
setup — same image, same network rules, same mounts. Local overrides go in
airlock.local.toml (gitignored). Built-in presets for common ecosystems
(Rust, Python, Node.js, and more) provide sensible defaults out of the box.
Coming up next!
- MCP proxy for stdio-based MCP servers (e.g. Playwright MCP from inside the VM)
- System-admin-managed configuration defaults and policies
- Network configuration editing from the Monitor dashboard
Similar projects
There are several tools in this space, each with a different focus. Here’s how airlock compares:
- Microsandbox — the closest open-source alternative. To be honest, this is a very promising project with very similar ideology and feature set. It focuses a bit more on being an SDK for programmatic usage whereas airlock focuses on pure terminal cli, but Microsandbox has a very decent CLI as well.
- Docker Sandboxes — microVM-based sandboxes with a deny-by-default network proxy, per-sandbox Docker daemon, and credential injection. Network policies are domain-level allowlists (HTTP/HTTPS only, no raw TCP control or scripting). Configuration is per-agent via CLI, not a shareable project-level config file.
- OpenShell — NVIDIA’s sandbox for AI agents using Docker containers with declarative YAML policies for filesystem, network (L4 + L7), and process access. Hot-reloadable, shareable policies. Requires Docker; container-level isolation, not VM.
- nsjail — Google’s lightweight process sandbox using Linux namespaces and seccomp-bpf. Single binary with a BPF policy language (conceptually similar to airlock’s Lua scripting). Process-level isolation, not VM. Config via protobuf files (shareable but verbose). Linux only.
- Codex CLI — OpenAI’s coding agent with built-in OS-level sandboxing (Seatbelt on macOS, Bubblewrap on Linux). Process-level isolation, binary on/off network control. Tightly coupled to the Codex agent, not a general-purpose sandbox. No shareable config.
- Vibe — lightweight Rust CLI that boots Debian VMs on ARM Macs using Apple Virtualization.framework. Zero-config, auto-shares project directory and credential dirs via VirtioFS. macOS only, Debian only (no OCI images), no network policy or shareable config.
- Tart — macOS and Linux VMs on Apple Silicon using Apple Virtualization.framework, OCI-compatible images. Designed for CI automation, not security sandboxing — no network policy or config-as-code.
- Lima — launches Linux VMs on macOS with file sharing and port forwarding. YAML config files (shareable). General-purpose Linux-on-Mac tool, not a security sandbox — no network isolation.
Installation and usage
Install
To install airlock on macOS or Linux, run:
curl -fsSL https://github.com/milankinen/airlock/releases/latest/download/install.sh | sh
This installs the bundled variant, which includes the VM kernel and
initramfs — everything you need in a single binary. The binary is placed in
~/.local/bin by default. Make sure it’s on your PATH:
export PATH="$PATH:$HOME/.local/bin"
If you prefer a smaller binary and want to supply your own kernel and initramfs, install the distroless variant instead:
curl -fsSL https://github.com/milankinen/airlock/releases/latest/download/install.sh | sh -s -- --distroless
The install directory can be changed with the AIRLOCK_INSTALL_DIR environment
variable, and a specific version can be pinned with AIRLOCK_VERSION.
Quick overview
Once installed, the basic workflow is straightforward:
airlock start                       # Boot a sandbox VM and open a shell
airlock start -- ls /usr            # Run a one-off command in the VM
airlock exec bash                   # Attach to a running VM
airlock show                        # Show sandbox status and config
airlock remove                      # Remove sandbox state
The first time you run airlock start in a project directory, airlock will
ask whether to create a default airlock.toml. After that, each subsequent
start reuses the existing configuration and sandbox state.
The following sections cover each of these commands in detail.
Starting a sandbox
The airlock start command boots a sandbox VM in the current project
directory. If no airlock.toml exists yet, airlock will offer to create one
with sensible defaults.
airlock start
On first run, airlock pulls the configured OCI image (Alpine by default), generates a per-project CA certificate, and boots the VM. Subsequent runs reuse the cached image and existing sandbox state, so startup is near-instant.
Configuration basics
Sandbox configuration lives in two files at the project root:
airlock.toml— the main config, meant to be committed to version controlairlock.local.toml— local overrides, typically gitignored
A minimal config that uses Ubuntu instead of the default Alpine:
[vm]
image = "ubuntu:24.04"
All configuration options are covered in the Configuration
chapter. For now, the most important thing to know is that the [vm] section
controls the image and resource allocation.
Running commands
By default, airlock start opens an interactive shell inside the VM. You can
also pass a command after -- to run it directly:
airlock start -- python3 -c "print('hello from the sandbox')"
The command runs inside the container and airlock exits when it finishes, returning the command’s exit code.
Login shell
The --login flag (or -l) starts a login shell that sources /etc/profile
and ~/.profile before running the command. This is useful when the image
sets up environment variables or PATH entries through profile scripts:
airlock start --login
Project directory and working directory
airlock automatically mounts the host project directory into the VM at the same path. The working directory inside the container defaults to the host’s current directory, so files are right where you’d expect them.
To override the working directory inside the sandbox, use --sandbox-cwd:
airlock start --sandbox-cwd /tmp
Image pulling and caching
airlock pulls OCI images and caches them locally under ~/.cache/airlock/oci/.
Image metadata lives in oci/images/<digest> (one JSON file per image) and
the underlying layer trees in a shared oci/layers/ cache that
deduplicates across images. On subsequent runs, the cached image is reused
unless the remote tag has changed.
By default, airlock tries the local Docker daemon first and falls back to
pulling from the OCI registry. This can be controlled with the resolution
field in the config:
# Always pull from the registry, skip Docker
[vm.image]
name = "ubuntu:24.04"
resolution = "registry"
The three resolution modes are:
auto— try Docker daemon first, fall back to the registry (default)docker— use the local Docker daemon only; fail if the image isn’t foundregistry— always pull from the registry, ignore Docker
For private registries, airlock prompts for a username and password the first
time it sees a 401 Unauthorized response. When the vault is enabled (see
Secrets management), credentials are saved and keyed by
registry host so subsequent pulls reuse them. With the vault disabled,
airlock prompts on every pull that requires auth.
For development registries served over plain HTTP, set insecure = true:
[vm.image]
name = "localhost:5005/my-dev-image:latest"
resolution = "registry"
insecure = true
Monitor dashboard
Pass --monitor (-m) to open a tabbed TUI control panel alongside the
sandbox shell, with live network, CPU, and memory views. See the
Monitor dashboard chapter for details.
Verbose output
The --verbose flag (or -v) shows mounts and network rules during startup,
which is helpful for verifying your configuration:
airlock start --verbose
Supervisor logging
For debugging VM-level issues, you can increase the supervisor log verbosity
with --log-level:
airlock start --log-level debug
Log levels are trace, debug, info (default), warn, and error.
Logs are written to .airlock/airlock.log.
Quiet mode
The -q / --quiet flag suppresses airlock’s own output, which is useful
when running airlock in scripts or CI pipelines where only the command output
matters:
airlock start -q -- echo "only this is printed"
Attaching to a running sandbox
Once a sandbox is running (started with airlock start), you can open
additional sessions into it using airlock exec. This is useful when you
need a second terminal inside the VM — for example, to run tests in one
window while an agent works in another.
airlock exec bash
The shorthand alias airlock x does the same thing:
airlock x bash
You can run any command, not just shells:
airlock exec cat /etc/os-release
airlock exec python3 -m pytest tests/
Working directory
airlock exec walks up from the current directory to find the
sandbox’s .airlock/sandbox/cli.sock and runs the command in the
same directory inside the VM. To override, use --cwd (or -w):
airlock exec -w /tmp ls -la
Environment variables
Extra environment variables can be passed with -e (repeatable):
airlock exec -e DEBUG=1 -e LOG_LEVEL=trace ./run-tests.sh
They’re layered on top of the sandbox’s resolved environment (image
env + airlock.toml env); entries with the same key replace the
base value.
Login shell
Like start, the --login flag sources profile scripts before running the
command:
airlock exec --login bash
Managing sandbox data
Monitor dashboard
The --monitor (-m) flag opens a tabbed TUI control panel alongside
the sandbox shell. It’s most useful when you want to observe what the
sandbox is doing — which outbound connections it’s making, which are
being blocked by policy, and how it’s using CPU and memory.
airlock start --monitor
Tabs
- F1 — Sandbox: the embedded VM terminal, with 1000 lines of mouse-wheel scrollback. Alternate-screen apps (vim, htop, …) use the guest’s own screen and don’t have scrollback, just like in a normal terminal.
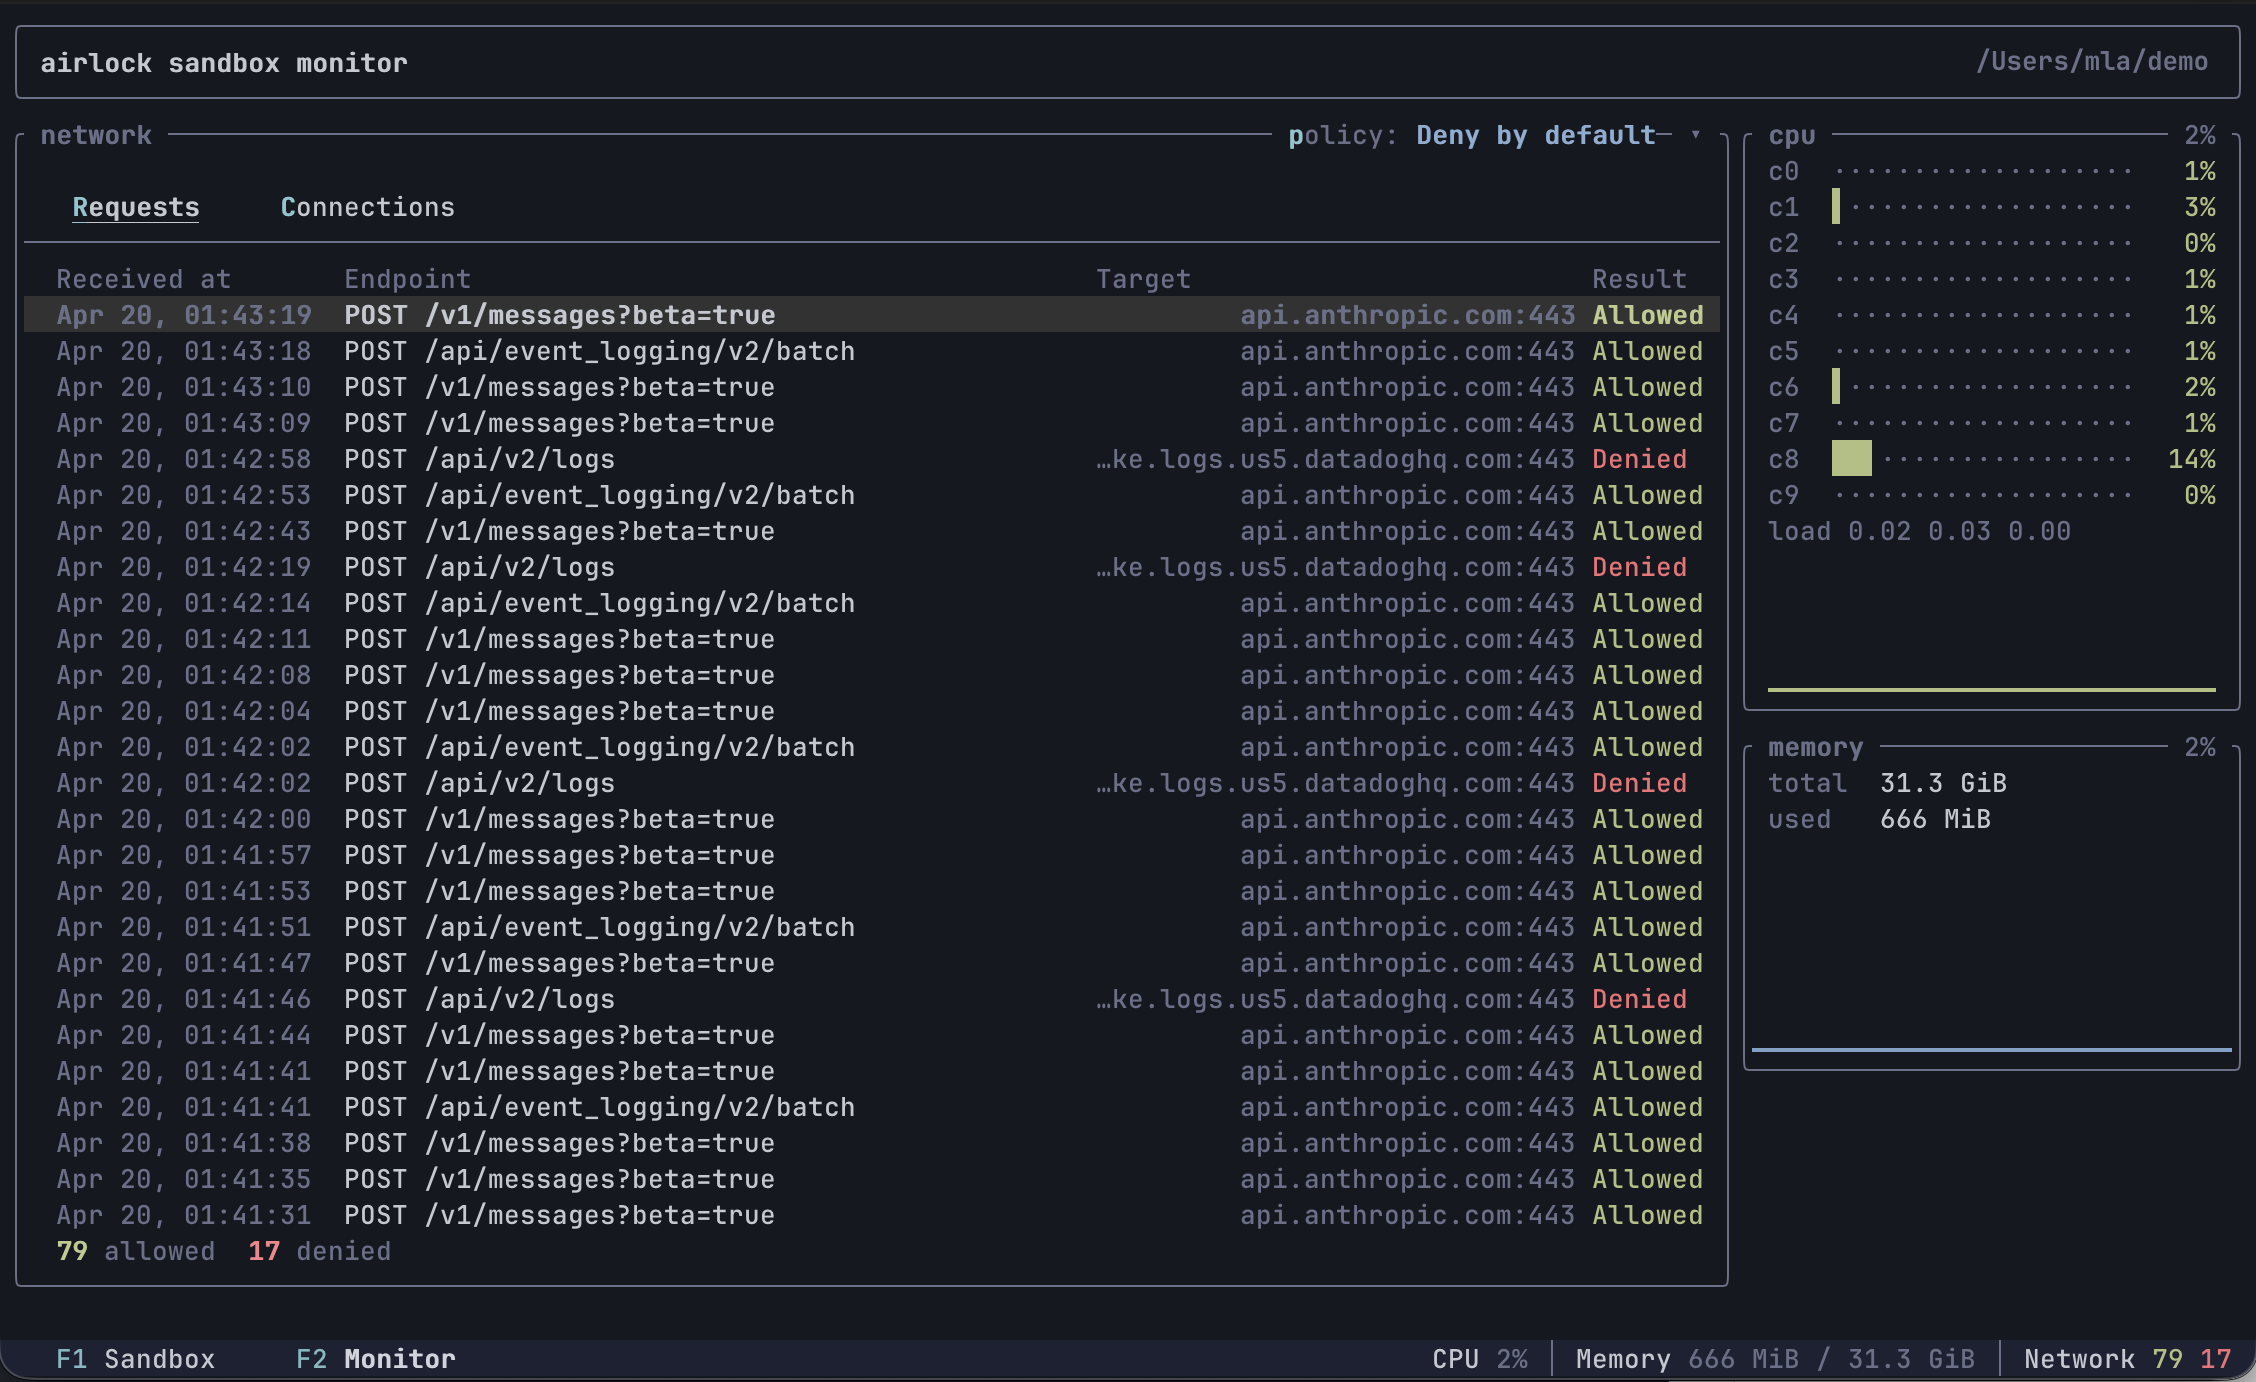
- F2 — Monitor: sandbox-wide observability. The left side shows a network panel with Requests (HTTP method, path, host, port, allow/deny) and Connections (raw TCP allow/deny) sub-tabs. The right side shows CPU and memory widgets sourced from the guest VM once per second.
Monitor tab
Network panel
Two sub-tabs (newest entries at the top, up to 100 of each). Both have a gray header row naming the columns.
- Requests (default) — one row per HTTP request the middleware
handled. Columns:
Received at,Endpoint(method + path),Target(host:port),Result(Allowedgreen /Deniedred). Denied HTTP requests are included here too: the proxy captures the full request before responding with403 Forbiddeninstead of refusing at the TCP layer, so you can see exactly what was attempted. - Connections — one row per raw TCP connection. Columns: a colored
⦿bullet,Target(host:port, white),Connected at,Disconnected at,Result. The bullet signals connection lifecycle: green means the connection is still open (Disconnected atis blank), gray means it closed, red means the connection was denied. A footer tracks running allow/deny counts.
Use ↑ / ↓ to move the row selection (PgUp/PgDn, Home, End also
work), and press Enter to open a details sub-tab with the full
snapshot — including captured request headers for HTTP. Close it with
Esc, x, or the × in the tab label.
Switch sub-tabs with r / c or click the sub-tab labels (mouse
capture must be on — see below).
Policy selector
The top-right of the network panel shows the active policy (e.g.
policy: Deny by default ▾). Press p or click the label to open a
dropdown and pick a new policy live — the change takes effect on the
next connection the sandbox makes. Colors hint at the strictness:
green (Always allow), blue (*-by-default), red (Always deny).
CPU widget
One row per guest CPU core, with a utilization bar and trailing percentage that both ramp green → yellow → orange → red with load. Below the per-core rows is the guest’s 1/5/15-minute load average and a short history sparkline of the mean utilization across cores.
Memory widget
Total and used bytes (reported the way free and htop do:
used = MemTotal - MemAvailable), plus a history sparkline of used%.
Keyboard shortcuts
| Key | Action |
|---|---|
F1 | Switch to Sandbox tab |
F2 | Switch to Monitor tab |
r | On Monitor tab: show Requests sub-tab |
c | On Monitor tab: show Connections sub-tab |
↑ / ↓ | Move row selection in Requests / Connections |
PgUp / PgDn | Jump the selection a page at a time |
Home / End | Jump to the newest / oldest entry |
Enter | Open the selected row in a details sub-tab |
Esc / x | Close the details sub-tab |
p | On Monitor tab: open the policy dropdown |
q | On Monitor tab: switch back to Sandbox tab |
Ctrl+D | On Monitor tab: ask the sandbox process to exit |
Personal settings
Buffer caps, terminal scrollback, and key bindings are personal
preferences — they live in ~/.airlock/settings.toml, not in the
per-project airlock.toml. All fields default to the values used
here, so there’s nothing to set unless you want to change them.
Buffer caps and scrollback
The Monitor tab keeps a rolling buffer of recent network activity. Once either buffer fills up, the oldest entries are dropped to make room for new ones (the lifetime allowed/denied counters are not affected). The Sandbox tab’s vt100 terminal keeps a separate scrollback buffer.
[monitor.buffers]
http = 100   # default; max HTTP request entries
tcp = 100   # default; max TCP connection entries
scrollback = 1000  # default; vt100 scrollback rows for the Sandbox tab
Bumping the buffers helps long sessions keep more history visible;
bumping scrollback lets you scroll further back into long build
output. Both are in-memory and don’t persist across sandbox restarts.
Key bindings
Shortcuts live in [monitor.keys] as an action-name → key(s) map.
Each value is either a single key string or a list of keys. Only the
actions you list here are overridden — the rest keep their defaults,
so a single back = "esc" is a complete config.
[monitor.keys]
switch-sandbox = "f1"               # force-switch to Sandbox tab
switch-monitor = "f2"               # force-switch to Monitor tab
back = "q"                # step back: list → Sandbox tab; modal → close
cancel = ["esc", "x"]       # dismiss the topmost modal
confirm = "enter"            # open details / apply policy
kill-sandbox = "ctrl+d"           # send SIGHUP+SIGTERM to the sandbox process
select-up = "up"
select-down = "down"
select-page-up = "pageup"
select-page-down = "pagedown"
select-newest = "home"
select-oldest = "end"
toggle-sub-tab = ["tab", "left", "right"]   # Requests ↔ Connections
select-requests = "r"
select-connections = "c"
open-policy = "p"                # open the network-policy dropdown
Key string format
[<modifier>+]*<key>. Modifiers (case-insensitive): ctrl, alt (or
option / meta), shift, super (or cmd / command). Keys:
- single ASCII chars:
q,1,+,?, … - named keys:
enter,esc/escape,tab,backspace,delete,space,up,down,left,right,home,end,pageup,pagedown,f1–f12
Examples: q, ctrl+d, shift+tab, f2, alt+enter.
shift+<letter> is treated the same as the lowercase letter — terminals
emit shifted letters as plain uppercase chars without a separate modifier
flag, so binding shift+a would never fire. Use a different modifier or
key if you want a shifted variant.
Action semantics
Actions are context-aware — back and confirm mean different things
depending on what’s open:
| Action | List view | Details pane | Policy dropdown |
|---|---|---|---|
back | switch to Sandbox tab | close details | close dropdown |
cancel | (no-op) | close details | close dropdown |
confirm | open details | (no-op) | apply highlighted policy |
The navigation actions (select-*, toggle-sub-tab, open-policy,
kill-sandbox) only apply on the Monitor tab. The Sandbox tab is full
keystroke passthrough — only the two switch-* shortcuts are intercepted.
Invalid key strings (unknown modifier, unknown key name) are reported up front when the sandbox starts; airlock refuses to launch the TUI rather than silently dropping a binding.
Selecting text
Clicking inside the Sandbox tab releases mouse capture so the host
terminal can handle drag natively — select text with the mouse and
copy it with your terminal’s copy shortcut (Ctrl+C on most Linux
terminals, Cmd+C on macOS). The footer shows a Selection mode
hint while capture is released. Press Esc or Ctrl+C to restore
mouse capture so clicks route back into the TUI.
The first click in the Sandbox tab is consumed by the mode switch itself; start the drag on the next press.
Configuration
airlock is configured through TOML files. The main configuration file is
airlock.toml at the project root, and it’s meant to be committed to version
control so that every team member gets the same sandbox setup.
File hierarchy
Configuration is loaded from up to four locations, with later files overriding earlier ones:
~/.airlock/config.tomlor~/.airlock.toml— user-level settings (e.g. preferred CPU/memory)airlock.toml— project config (checked into version control)airlock.local.toml— local overrides (gitignored)
This layering means a company can ship global defaults, individual developers can set personal preferences, and each project defines its own sandbox — with room for local tweaks that don’t affect the team.
JSON and YAML files are also accepted (e.g. airlock.json, airlock.yaml).
For each slot, the first matching extension in the order .toml, .json,
.yaml, .yml wins.
Minimal example
A project that uses Ubuntu with a Rust toolchain preset:
presets = ["rust"]

[vm]
image = "ubuntu:24.04"
cpus = 4
memory = "4 GB"
This is enough to get a working sandbox. The rust preset adds network rules
for crates.io and related hosts, so cargo build works out of the box.
Sandbox state
Sandbox runtime state (disk image, CA certificate, overlays, logs) is stored
in .airlock/ inside the project directory. This directory is automatically
excluded from version control. Running airlock rm removes it entirely;
airlock start recreates it from scratch.
Merging behaviour
When multiple configuration files are present, they’re merged with these rules:
- Object fields are merged recursively (e.g.
[vm]settings from different files are combined, not replaced) - Arrays are concatenated (e.g. preset lists from different levels stack)
- Scalar values are overridden by later files
- A
nullvalue never overwrites an existing value
This means you can set vm.cpus = 2 in your user config and only override
vm.image in the project config — both settings apply.
Overriding with enabled
Every named configuration entry — network rules, mounts, disk caches, and
socket forwards — has an enabled flag that defaults to true. Combined with
the hierarchical config loading, this gives individuals full control over
shared configurations.
For example, if the project airlock.toml defines a mount and a network rule
via a preset, a developer can disable either one in their airlock.local.toml
without modifying the shared config:
# airlock.local.toml — personal overrides, not committed

[mounts.ssh-config]
enabled = false

[network.rules.alpine-packages]
enabled = false
This works at every level. A company-wide global config can define baseline rules, a project config can add its own, and any developer can selectively disable what doesn’t apply to them — all without editing files that belong to someone else.
VM options
The [vm] section controls the virtual machine image and resource allocation.
Image
The image field specifies which OCI image to use as the container root
filesystem. By default, airlock uses alpine:latest:
[vm]
image = "ubuntu:24.04"
For more control — for example when pulling from a private or local registry — use the object form:
[vm.image]
name = "registry.company.com/base-image:latest"
resolution = "registry"
The resolution field controls where airlock looks for the image:
auto(default) — try the local Docker daemon first, fall back to the OCI registry. This is convenient if you already have the image locally.docker— only use the local Docker daemon. Fails if the image isn’t found.registry— always pull from the OCI registry, ignore Docker entirely. This is the right choice when Docker isn’t installed.
For development registries served over plain HTTP, set insecure = true:
[vm.image]
name = "localhost:5005/dev-image:latest"
resolution = "registry"
insecure = true
Resources
By default, airlock allocates all available host CPUs and half the system RAM to the VM. You can override these:
[vm]
cpus = 4
memory = "4 GB"
Memory accepts human-readable sizes like "512 MB", "4 GB", or "2G".
The minimum is 512 MB, and the maximum is the total system RAM.
Security hardening
The VM boundary is already the primary isolation layer, but harden
(enabled by default) adds a second belt inside the guest: namespace
restrictions and the no-new-privileges flag on the container process.
no-new-privileges means a setuid binary inside the sandbox can no longer
elevate to root — useful against local-privilege-escalation tricks an
agent might trip into, even though the blast radius is already confined
to the VM.
[vm]
harden = true   # default
Disable it only when a workload genuinely needs the broader kernel capabilities it takes away — the most common case is running Docker inside the VM, which needs to create its own namespaces and mounts.
Nested KVM (Linux only)
On Linux hosts with KVM support, you can expose /dev/kvm into the
guest so VMs running inside the sandbox get hardware acceleration:
[vm]
kvm = true
This is what you need for, say, running qemu-system-* or another
hypervisor from inside the sandbox without falling back to software
emulation. It’s only available on Linux and requires /dev/kvm
access on the host — Apple Virtualization on macOS doesn’t expose
nested virt.
Disk and cache
airlock creates a sparse ext4 disk image for each project sandbox. This disk persists writes that happen outside of mounted host directories — things like installed system packages, global tool caches, or any files the container process creates on the root filesystem.
The disk is 10 GB by default (sparse, so it only uses actual disk space for data written). You can change the size:
[disk]
size = "20 GB"
Resizing
If you increase disk.size in the config, airlock grows the disk image on the
next start and the ext4 filesystem is automatically expanded inside the VM.
Existing data is preserved — this is a safe operation.
If you decrease disk.size, the disk image is deleted and recreated at the
new size. This means all data on the disk is lost, including installed
packages and any state not backed by named caches. There is no in-place
shrink — the only way to reduce the disk size is a full reset.
Named caches
When you change the project’s OCI image (e.g. upgrading from ubuntu:22.04
to ubuntu:24.04), the disk contents are reset to match the new image. This
is usually what you want — a clean slate — but some directories are worth
preserving across image changes.
Named caches solve this. Each cache entry lists one or more container paths that should be backed by persistent storage that survives image changes:
[disk.cache.cargo]
paths = ["~/.cargo/registry"]

[disk.cache.node-modules]
paths = ["node_modules"]
Relative paths (like node_modules) are resolved relative to the project
directory inside the container. Paths starting with ~ are expanded to the
container user’s home directory.
This is especially useful for package manager caches. Without named caches,
switching the base image would force a full re-download of all dependencies.
With them, cargo build or npm install picks up right where it left off.
A cache can be temporarily disabled without removing it from the config:
[disk.cache.cargo]
enabled = false
paths = ["~/.cargo/registry"]
Environment variables
The [env] section defines environment variables that are injected into the
container at startup. This is the primary mechanism for passing configuration
and secrets from the host into the sandbox.
Static values
For values that are the same regardless of the host environment:
[env]
EDITOR = "vim"
TERM = "xterm-256color"
Variable substitution
To forward a value from the host into the sandbox, use the ${VAR} syntax:
[env]
API_TOKEN = "${MY_API_TOKEN}"
When airlock starts, it resolves MY_API_TOKEN first from the host
environment and then from the secret vault, and injects
the result as API_TOKEN inside the container. Starting the sandbox
fails if the variable is not defined in either source.
You can provide a fallback value with ${VAR:default}:
[env]
LOG_LEVEL = "${LOG_LEVEL:info}"
Substitution is handled by the subst
crate — see its docs for the full reference on escaping, nested
expansions, and other forms.
Secrets
Values you don’t want to keep in your shell environment can be saved in
the airlock secret vault and referenced by the same ${VAR} syntax.
See the Secrets management chapter for the full
reference — storage backends, trade-offs, and recommendations.
Mounts
airlock can share host files and directories into the VM using VirtioFS mounts. The project directory is always mounted automatically at its exact host path, but you can add additional mounts for things like SSH config, credential files, or shared caches.
Defining a mount
Each mount is a named entry under [mounts]:
[mounts.ssh-config]
source = "~/.ssh/config"
target = "~/.ssh/config"
read_only = true
The source is a path on the host and target is the path inside the
container. Both support ~ expansion to the respective home directory.
Container-side ~ and HOME
The default home directory inside the sandbox comes from the OCI
image’s user record — typically /root for images that run as root.
If you override HOME via [env], ~ in mount targets
expands to your value instead, so the path the file is mounted at
matches what $HOME/... resolves to inside the shell:
[env]
HOME = "/home/dev"

[mounts.ssh-config]
source = "~/.ssh/config"   # host: ~/.ssh/config (your host home)
target = "~/.ssh/config"   # guest: /home/dev/.ssh/config
Without the override, the same target = "~/.ssh/config" would mount
at /root/.ssh/config while the shell’s $HOME reported /root —
either way, ~ and $HOME agree. The override is only needed when
the image’s home doesn’t match where you actually want files to land
(e.g. running as a non-root user the image doesn’t ship with).
Read-only mounts
Setting read_only = true prevents the container from writing to the mount.
This is a good default for configuration files and credentials that the
sandbox should be able to read but not modify:
[mounts.aws-credentials]
source = "~/.aws/credentials"
target = "~/.aws/credentials"
read_only = true
Handling missing sources
By default, airlock fails if a mount’s source path doesn’t exist on the host.
The missing field controls this behaviour:
[mounts.optional-config]
source = "~/.config/myapp/settings.json"
target = "~/.config/myapp/settings.json"
missing = "warn"
The available options are:
fail(default) — stop with an error if the source doesn’t existwarn— skip the mount and print a warningignore— skip the mount silentlycreate-dir— create the source as a directory and mount itcreate-file— create the source as a file and mount it
When using create-file, you can provide initial content for the new file:
[mounts.git-config]
source = "~/.airlock/gitconfig"
target = "~/.gitconfig"
missing = "create-file"
file_content = "[user]\n\tname = Dev\n\temail = dev@example.com\n"
Disabling a mount
A mount can be temporarily disabled without removing it from the config. This is useful when a preset defines a mount that you don’t need:
[mounts.ssh-config]
enabled = false
source = "~/.ssh/config"
target = "~/.ssh/config"
Network
The VM has no network interfaces of its own. All TCP traffic from the guest is routed through a vsock channel back to the host, where airlock evaluates it against the configured network rules. This gives the host full control over what the sandbox can reach.
Policy
The network policy controls the overall behavior before rules are evaluated:
[network]
policy = "deny-by-default"
Available policies:
| Policy | Behavior |
|---|---|
allow-always | Skip rules, allow all connections (default) |
deny-always | Skip rules, deny everything (including port forwards/sockets) |
allow-by-default | Allow unless explicitly denied by a rule |
deny-by-default | Deny unless explicitly allowed by a rule |
With deny-by-default, only connections matching an explicit allow rule
are permitted. This is the recommended starting point for security-sensitive
projects. With deny-always, all network access is blocked — including port
forwards and Unix socket forwarding.
Network rules
Rules are named entries under [network.rules]. Each rule defines allow
and/or deny patterns:
[network.rules.package-registry]
allow = [
    "registry.npmjs.org",
    "registry.yarnpkg.com",
]
Patterns support wildcards for both host and port:
[network.rules.company-services]
allow = [
    "*.prod.example.com", # any subdomain
    "registry.example.com:443", # specific port
    "*:80", # any host on port 80
]
deny = [
    "internal.prod.example.com", # except this one
]
Deny patterns are always checked first and win unconditionally, regardless of allow rules. This makes it safe to use broad wildcards in allow lists while still blocking specific destinations.
Rules can be disabled without removing them:
[network.rules.debug-access]
enabled = false
allow = ["*"]
Passthrough
By default, every allowed connection is peeked at to detect TLS and HTTP so
that the traffic can be intercepted and surfaced in the monitor. For
non-HTTP protocols whose first bytes are neither ASCII request lines nor
a TLS ClientHello, that detection would deadlock waiting for input the
protocol will never send (Postgres’ 8-byte SSLRequest is the classic
example).
Mark such rules with passthrough = true to skip all detection and relay
the connection as plain TCP:
[network.rules.database]
allow = ["db.example.com:5432"]
passthrough = true
A passthrough target cannot also be covered by middleware — the two are
incompatible, and airlock refuses to start if it finds a rule target that
also appears in any middleware target list, naming the offending rule
and middleware.
Port and unix socket forwards are always passthrough: the guest-side
localhost:<port> may carry arbitrary traffic to whatever service runs
on the host port, so interception is suppressed automatically.
Middleware
When you need to do more than just allow or deny connections — for example,
injecting authentication headers or inspecting request paths — you can define
middleware. Middleware is separate from rules and matches connections by its
own target patterns. It triggers transparent TLS interception for matching
hosts, letting airlock read and modify HTTP traffic.
[network.middleware.my-api-auth]
target = ["api.example.com:443"]
env.TOKEN = "${MY_API_KEY}"
script = '''
if not env.TOKEN then
    req:deny()
end
req:setHeader("Authorization", "Bearer " .. env.TOKEN)
'''
The target field uses the same pattern syntax as rule allow/deny lists.
Middleware only runs for connections that have been allowed (by policy or rules)
— denied connections never reach middleware.
The env table maps names to values expanded from the host environment using
${VAR} syntax. Inside the Lua script, these are available as env.TOKEN
(or nil if the host variable isn’t set).
A per-project CA certificate is automatically generated and installed in the VM’s system trust store, so TLS interception is transparent to processes inside the container — they see valid certificates.
Middleware can be disabled without removing it:
[network.middleware.my-api-auth]
enabled = false
target = ["api.example.com:443"]
script = '...'
For a complete guide to the scripting API — including request/response inspection, body manipulation, and chaining multiple middleware layers — see Network scripting.
Unix socket forwarding
Host Unix sockets can be forwarded into the guest container. This is commonly used for Docker socket access:
[network.sockets.docker]
host = "/var/run/docker.sock"
When the host and guest paths differ, use "source:target" syntax
(host path : guest path):
[network.sockets.docker]
host = "~/.docker/run/docker.sock:/var/run/docker.sock"
The socket appears at the specified guest path and connections are relayed
back to the host socket transparently. Like other config entries, socket
forwards can be disabled with enabled = false.
Port forwarding
Port forwards bridge TCP between the host and the guest in either
direction. Each forward is declared under [network.ports.<group>] and
every entry uses the same "host:guest" string syntax — the left
side is always the host port, the right side is always the guest
port, regardless of which direction the forward runs.
A plain integer shorthand ([5432], [3000]) means the same port on
both sides.
Guest → host (host = [...])
Some projects run supporting services on the host — a local PostgreSQL,
a Redis, a dev-mode backend on port 3000 — and the sandboxed process
needs to talk to them. Rather than expose those services to the
network, airlock can forward specific host TCP ports into the VM so
that localhost:<port> inside the sandbox transparently reaches the
host service, while everything else on loopback stays confined to the
guest.
[network.ports.local-services]
host = [5432, 6379]
This makes the host’s PostgreSQL and Redis available at
localhost:5432 and localhost:6379 inside the sandbox. Guest → host
forwards bypass network rules entirely — they’re always allowed
regardless of policy (except deny-always, which blocks everything).
Each entry is either a plain port (same port on both sides) or a
"host:guest" string:
[network.ports.dev]
host = [8080, "9000:3000"]  # guest `localhost:3000` → host port 9000
Host → guest (guest = [...])
The inverse: a service running inside the sandbox can be reached
from the host. airlock binds a listener on 127.0.0.1:<host_port> and
every accepted connection is bridged to 127.0.0.1:<guest_port>
inside the guest.
[network.ports.web]
guest = ["5000:4000"]  # host `127.0.0.1:5000` → guest `localhost:4000`
Notes:
- Loopback only. Listeners bind on
127.0.0.1; the forward is not reachable from the LAN. - No rules, no policy. Host → guest traffic bypasses
allow/deny/middleware entirely — the host is trusted, anddeny-alwaysdoes not block reverse forwards. - Startup-time bind. If the host port is already in use the sandbox fails to start with a clear error.
- Host-port collisions are an error. Two
.guestentries sharing the same host port is rejected at startup.
Combined example
Both directions can be declared side by side in the same group:
[network.ports.dev]
host  = ["9000:3000"]   # host :9000 ← guest :3000
guest = ["5000:4000"]   # host :5000 → guest :4000
Like other config entries, port forward groups can be disabled with
enabled = false.
Daemons
Daemons are sidecar processes that run in parallel with your main shell.
They are useful for anything that needs to stay alive for the duration of
the sandbox — a database, a language server, dockerd inside the VM, or
a build watcher.
Each daemon is declared as [daemons.<name>]. Daemons start just after
the VM is ready and before the main shell, and are shut down cleanly
when the main shell exits.
Minimal example
[daemons.redis]
command = ["redis-server", "/etc/redis.conf"]
That is enough to keep a single Redis server running for the life of the
sandbox. On crash it restarts (up to 10 times by default) with a one
second delay per retry. When you exit the shell, it is sent SIGTERM
and given 10 seconds to stop before being SIGKILLed.
Full reference
[daemons.my-daemon]
enabled      = true                # default true
command      = ["cmd", "arg1"]     # required; argv-style
cwd          = "/"                 # default "/"
signal       = "SIGTERM"           # default; graceful-stop signal
timeout      = 10                  # default; seconds before SIGKILL
restart      = "always"            # default; or "on-failure"
max_restarts = 10                  # default; 0 = infinite
harden       = true                # default; per-daemon override

[daemons.my-daemon.env]
FOO = "literal"
BAR = "${HOST_VAR}"                # ${VAR} resolved at start
command
Argv-style list. The first element is the executable (looked up on
$PATH unless absolute), the rest are arguments. Required.
cwd
Working directory inside the sandbox. Defaults to /.
signal
The signal used to ask the daemon to shut down gracefully. One of
SIGTERM, SIGINT, SIGHUP, SIGQUIT, SIGUSR1, SIGUSR2, SIGKILL.
Any other name is a config error. Default: SIGTERM.
timeout
Seconds to wait after signal before escalating to SIGKILL. 0 means
wait forever — the SIGKILL step is skipped and airlock will block at
shutdown until the daemon exits on its own. Default: 10.
restart
always(default) — restart whenever the daemon exits, untilmax_restartsis reached.on-failure— restart only on non-zero exit. A clean exit ends the restart loop and the daemon is reported as “stopped”.
max_restarts
Maximum number of restart attempts after the initial launch. 0 disables
the cap. Default: 10. Retries use linear backoff (attempt_number seconds).
harden
Whether the sandbox hardening (no_new_privs, namespace isolation) applies
to this daemon. Per-daemon override of the global vm.harden setting —
set to false for daemons that need extra privileges (e.g. dockerd).
Default: true.
env
Per-daemon environment variables. Supports the same ${VAR} and
${VAR:default} substitution as the top-level [env]
section, resolved from the host environment and the
secret vault. Values declared here layer on top of
the image’s baseline environment; the daemon does not inherit the main
shell’s [env] entries.
Logs
Each daemon’s stdout and stderr are redirected to files under
/airlock/daemons/<name>/ inside the VM:
/airlock/daemons/<name>/stdout.log
/airlock/daemons/<name>/stderr.log
The log files are truncated each time the sandbox starts, and appended to across automatic restarts within a single session.
Shutdown
When the main shell exits, airlock asks each daemon to stop (by sending
signal), waits up to timeout seconds, then escalates to SIGKILL for
anything still alive. The CLI shows a spinner per daemon during this
window and prints a final status line:
  ✓ daemon redis: shut down
  ✓ daemon dockerd: killed
killed means the daemon had to be SIGKILLed; shut down means it
exited on its own within the timeout.
Disabling a daemon
A daemon can be disabled without removing the entry from the config — useful when a preset defines one you don’t need:
[daemons.redis]
enabled = false
Masks
Masks hide subdirectories of the project from the sandbox. Each mask bind-mounts an empty directory over the listed paths, so processes inside the VM see those directories as present but empty. The host files are not touched — masking is applied per-VM-start, on top of the project mount.
The typical use case is cordoning off parts of a monorepo from an AI
agent: secrets/, an unrelated app, or a vendor tree the agent has no
reason to read.
Defining a mask
Each mask is a named entry under [mask.<name>]:
[mask.secrets]
paths = ["secrets"]
Inside the sandbox, secrets/ now appears as an empty directory; the
real contents on the host stay untouched and visible from outside.
Multiple paths per mask
A single mask block can hide several paths. They share the same empty source directory, which is fine since the contents are always empty:
[mask.private]
paths = ["apps/admin", "internal/notes", "vendor/closed-source"]
Path rules
Paths are project-relative and validated by the host before the sandbox starts. The following are rejected:
- absolute paths (starting with
/) - home-relative paths (starting with
~) - any segment equal to
..
If a listed path doesn’t exist in the project, the guest creates it (as
an empty directory) before applying the mask, so order of mkdir and
mask doesn’t matter.
Disabling a mask
A mask can be disabled without removing the entry — useful when a preset defines one you don’t need:
[mask.secrets]
enabled = false
paths = ["secrets"]
Notes
- Masks are recreated on every VM start, so the host config is the source of truth — there is no per-VM state to clean up.
- Masking is invisibility, not a security boundary. The hide is
applied as a bind-mount inside the VM, on top of the project mount
— the masked files are still shared into the VM via virtiofs, just
shadowed by an empty directory at their path. A cooperative agent
won’t see them, which is the point. A process that actively wants
to defeat the mask (and has enough privilege to call
umountor walk the underlying mount) can still reach the contents. If you need a hard boundary, keep those paths in a separate project entirely. - The sandbox’s own
.airlock/directory is always masked unconditionally, so processes in the VM can’t reach back into the CA keys, disk image, or lock file. git statuswill report masked files as deleted (the worktree copy is gone from the sandbox’s view, but the index still references them). This is expected; if it bothers you, run git from outside the sandbox for those paths.
Presets
Presets are built-in configuration bundles that ship with airlock. Instead of manually listing every package registry and cache directory for your tech stack — or every API endpoint and credential mount for an AI agent — you pick the relevant presets and they handle the details.
Using presets
Add presets to the top-level presets array in your config:
presets = ["debian", "rust", "claude-code"]

[vm]
image = "ubuntu:24.04"
Presets are applied as a base layer; your own configuration always takes priority and overrides anything a preset defines. Multiple presets can be combined freely.
Distribution presets
These open network access to the package repositories for each Linux
distribution so that apt install, apk add, and friends work out of the
box.
alpine— Alpine Linux package mirrorsdebian— Debian and Ubuntu package repositories (including PPAs and security updates)fedora— Fedora, CentOS, and RHEL package mirrorsarch— Arch Linux and AUR repositoriessuse— openSUSE and SUSE update servers
Pick the one that matches your base image. For ubuntu:24.04, the
debian preset is the right choice.
Language presets
These open network access to language-specific package registries so your package manager can fetch dependencies.
rust— crates.io and Rust toolchain downloadspython— PyPInodejs— npm and Yarn registries
AI agent presets
These configure network rules, credential forwarding, and settings mounts
for popular AI coding agents. Each agent has its own chapter with the full
setup — what the preset wires up, which secret or environment variable it
expects, and an example airlock.toml:
Missing a preset for your favourite agent? PRs welcome — the presets live
as small TOML files under app/airlock-cli/src/config/presets/.
Combining presets with custom rules
A typical project config combines a distribution preset with a language preset and an agent preset, then adds project-specific rules on top:
presets = ["debian", "python", "claude-code"]

[vm]
image = "ubuntu:24.04"

[network]
policy = "deny-by-default"

[network.rules.internal-api]
allow = ["api.internal.company.com:443"]

[network.middleware.internal-api-auth]
target = ["api.internal.company.com:443"]
env.TOKEN = "${INTERNAL_API_TOKEN}"
script = '''
req:setHeader("Authorization", "Bearer " .. env.TOKEN)
'''
This gives you Debian package repos, PyPI, Claude API access, and your internal API — all in a deny-by-default sandbox.
Overriding preset rules
Since presets are regular configuration applied at a lower priority, you can override or disable any rule they define. If a preset opens network access to something you don’t need, disable it in your project config or local overrides:
# airlock.local.toml
[network.rules.alpine-packages]
enabled = false
See the Configuration chapter for more on how the
hierarchical config system and enabled flags work together.
Claude Code
The claude-code preset bundles the sandbox setup for running
Claude Code
inside airlock. It wires up the network rules, credential handling,
and settings persistence so you only need to pick an image that
ships the claude CLI and drop the preset into your config.
What the preset does
The real OAuth token stays on the host; the VM only sees a placeholder. The token is injected into Anthropic API requests at the host boundary, so it is never exposed to processes running inside the sandbox.
- Your token stays on the host. Requests to
api.anthropic.comare intercepted by airlock on the host and the realAuthorizationheader is injected there. Inside the VM,CLAUDE_CODE_OAUTH_TOKENis a placeholder value. - Only Anthropic endpoints are reachable (
api.anthropic.com,claude.ai,downloads.claude.ai,platform.claude.com). Everything else stays blocked by your deny-by-default policy. - Claude knows it’s sandboxed.
IS_SANDBOX=1is set so Claude skips host-only behaviour, andNODE_EXTRA_CA_CERTSpoints at the airlock CA so the middleware’s TLS interception is trusted. - Your onboarding survives.
~/.claudeand~/.claude.jsoninside the sandbox are backed by~/.airlock/claude/settingsand~/.airlock/claude/claude.jsonon the host, so login state, preferences, and project memory carry over between sandbox runs. Disable either mount inairlock.local.tomlif you prefer a fresh sandbox each time.
Example airlock.toml
presets = ["claude-code"]

[network]
policy = "deny-by-default"

[vm]
image = "docker/sandbox-templates:claude-code"
The docker/sandbox-templates:claude-code image ships with claude
already installed. For a real project, you might prefer your own
project-specific image.
Providing the OAuth token
The middleware expects CLAUDE_CODE_OAUTH_TOKEN on the host.
Get one by running claude setup-token outside the sandbox.
Store the token in the airlock
secret vault under the name CLAUDE_CODE_OAUTH_TOKEN:
airlock secrets add CLAUDE_CODE_OAUTH_TOKEN
Running it
airlock start --monitor -- claude --dangerously-skip-permissions
Mounting your host Claude settings
By default, the claude-code preset mounts Claude settings from the
~/.airlock/claude directory so the sandboxed Claude doesn’t touch
your primary host settings. If you’d rather share the host settings
into the VM, point the default mount sources at them:
[mounts.claude-settings]
source = "~/.claude"

[mounts.claude-json]
source = "~/.claude.json"
GitHub Copilot CLI
The copilot-cli preset bundles the sandbox setup for the
GitHub Copilot CLI.
It keeps the Copilot OAuth token on the host and scopes network
access to the GitHub endpoints Copilot actually uses.
What the preset does
The sandbox sees a placeholder token, and airlock swaps in the real token at the host boundary — only on the specific paths Copilot uses.
- Your token stays on the host. Copilot requests are intercepted
on
api.github.comand*.githubcopilot.com, and the realAuthorizationheader is injected there at host side. Onapi.github.comthe injection is path-scoped to/copilot_internal/*, so any other GitHub API call an agent might make will not receive the Copilot token. - Only Copilot endpoints are reachable (
api.github.comand*.githubcopilot.com). Everything else stays blocked by your deny-by-default policy. - Your Copilot session survives.
~/.config/ghis mapped to~/.airlock/copilot/on the host, so thegh authstate and Copilot preferences carry over between sandboxes.
Example airlock.toml
presets = ["copilot-cli"]

[network]
policy = "deny-by-default"

[vm]
image = "docker/sandbox-templates:copilot-docker"
The docker/sandbox-templates:copilot-docker image ships with copilot
already installed. For a real project, you might prefer your own
project-specific image.
Providing the GitHub token
Create a dedicated fine-grained PAT with the Copilot scopes at https://github.com/settings/tokens.
Store your PAT in the airlock
secret vault under the name COPILOT_GITHUB_TOKEN:
airlock secrets add COPILOT_GITHUB_TOKEN
Running it
airlock start --monitor -- copilot
OpenAI Codex
The openai-codex preset bundles the sandbox setup for the
OpenAI Codex CLI. It keeps your
OpenAI API key on the host and lets the sandbox run against a
placeholder value — Codex talks to OpenAI normally, but it never
sees the real credential.
What the preset does
Codex reads its API key from OPENAI_API_KEY at startup and sends
it as a bearer token on every request. The preset sets the VM’s env
var to a placeholder, and airlock substitutes the real key at the
host boundary on the way out to OpenAI.
- Your API key stays on the host. Requests to
api.openai.comare intercepted on the host and the realAuthorizationheader is injected there; inside the VM,OPENAI_API_KEYis just a placeholder. - Only OpenAI endpoints are reachable (
api.openai.comandauth.openai.com). Everything else stays blocked by your deny-by-default policy. - Your Codex settings survive.
~/.codexis mapped to~/.airlock/codex/on the host, so preferences and history carry over between sandbox runs.
Example airlock.toml
presets = ["openai-codex"]

[network]
policy = "deny-by-default"

[vm]
image = "docker/sandbox-templates:codex-docker"
The docker/sandbox-templates:codex-docker image ships with codex
already installed. For a real project, you might prefer your own
project-specific image.
Providing the API key
Store your OpenAI API key in the airlock
secret vault under the name OPENAI_API_KEY:
airlock secrets add OPENAI_API_KEY
The middleware resolves ${OPENAI_API_KEY} from the host env first
and the vault as a fallback. A missing value aborts airlock start
with a clear error rather than silently shipping requests without
auth.
Running it
airlock start --monitor -- codex --yolo
Secrets management
Most projects need secrets — API tokens, deploy keys, per-environment
passwords. The usual workaround is to export them as shell variables
and reference them from config with ${VAR}, but that’s both
inconvenient (you have to remember to export them every session) and
leaky (the value ends up in your shell history, in every child
process’s environment, and often in log output). airlock ships a small
secret vault so you can save a value once and reference it the
same way you would any other ${VAR} — but without the value ever
appearing in your shell env.
Vault entries are consulted as a fallback to the host environment, so
common templates like ${PATH} still resolve from the shell without
the vault ever being opened. Only names the shell doesn’t define fall
through to the vault.
Quick start
Save, list, and remove secrets with the airlock secrets subcommand:
airlock secrets add MY_API_TOKEN     # prompts for the value
airlock secrets list                 # lists saved names + masked previews
airlock secrets remove MY_API_TOKEN
The short aliases secret, ls, and rm also work.
list prints a VALUE column with a ****-prefixed preview — the last
four chars of the value when it’s at least 16 chars long, two chars when
at least 8, and no suffix at all for anything shorter. It’s meant purely
for disambiguating entries when you have several similarly-named tokens
stored; the full value is never printed anywhere.
Reference the saved value from [env] the same way as any host env
variable:
[env]
API_TOKEN = "${MY_API_TOKEN}"
On airlock start, the template is expanded using the host env first
and the vault as fallback, and the result is injected as API_TOKEN
inside the sandbox. The same substitution applies in Lua middleware
env tables (see Network scripting).
Choosing a storage backend
The vault can be backed by one of four storage types, picked with
vault.storage in ~/.airlock/settings.toml:
| Backend | At-rest protection | Prompts on use | Headless / CI friendly |
|---|---|---|---|
keyring (default) | OS keychain / Secret Service | OS unlock | GUI-dependent |
encrypted-file | AEAD (ChaCha20-Poly1305 + Argon2id) | Passphrase | Yes (via env var) |
file | chmod 600 only (cleartext JSON) | None | Yes |
disabled | N/A — airlock secrets is turned off | None | Yes |
# ~/.airlock/settings.toml
vault.storage = "encrypted-file"
Settings may also be written in JSON (settings.json) or YAML
(settings.yaml / settings.yml); TOML wins if more than one file
exists.
keyring — system keychain / Secret Service
Stores the vault in the macOS Keychain or the Linux Secret Service (GNOME Keyring, KWallet). First access per session triggers the OS unlock prompt; afterwards the keyring is unlocked for the rest of the session and no further prompts appear.
Why it’s the default: on a normal desktop / laptop the unlock piggybacks on your OS login, so there’s no extra passphrase to remember and secrets still get OS-level at-rest protection. The UX is indistinguishable from any other app that uses the system password store.
Drawbacks:
- On headless SSH sessions the graphical unlock can’t render, so the
first vault access hangs or fails. Use
encrypted-filefor CI / remote-development boxes. - On Linux, the secret-service daemon has to be running; minimal desktop setups and some WSL environments don’t ship one.
- The vault is bound to the OS user account — backing it up or moving it between machines isn’t straightforward.
encrypted-file — passphrase-encrypted JSON
Secrets live in ~/.airlock/vault.default.enc.json, with the data
field as an Argon2id-derived-key + ChaCha20-Poly1305-encrypted blob.
The passphrase is taken from AIRLOCK_VAULT_PASSPHRASE if set,
otherwise airlock prompts on the terminal. You’ll be prompted twice on
first use (new vault) and once per process thereafter; the prompt line
is erased on successful input so the terminal stays clean.
Why you might pick it: works on every platform including headless boxes where no keychain is available, and degrades cleanly in CI via the environment variable:
export AIRLOCK_VAULT_PASSPHRASE='correct horse battery staple'
airlock start
Drawbacks: you have to type the passphrase once per shell session, and the protection is only as strong as the passphrase itself — a short or reused one is a weak link.
file — plaintext JSON
Secrets and registry credentials are written to
~/.airlock/vault.default.json with mode 0600. No crypto, no
prompts, works everywhere.
Why you might pick it: zero friction. Useful for throwaway test boxes or when you’re debugging the vault itself and need to inspect the on-disk format.
Drawbacks: anyone who can read that file — including backup
snapshots, disk forensics, or a sloppy tar of your home directory —
reads the secrets. airlock secrets add shows a one-time warning when
this backend is active; pass --yes to skip the confirmation in
scripts.
disabled — vault turned off
airlock secrets refuses to run. ${VAR} templates resolve only
against the host env, and if a referenced name isn’t set there,
airlock start fails with a clear error. Registry auth falls back to
re-prompting on every 401 (credentials are never saved).
Why you might pick it: you already have a secrets pipeline you trust (a 1Password CLI wrapper, a Vault agent, etc.) and you want airlock to stay out of the way.
When to switch away from the default
- On a shared box, a CI runner, or a dev container —
encrypted-filewithAIRLOCK_VAULT_PASSPHRASEsupplied as a job secret. You get OS-independent at-rest protection without depending on a desktop keychain session. - For throwaway environments —
fileis fine if you understand what you’re giving up. - If you already manage secrets elsewhere —
disabled, and source the values into your shell env before runningairlock start.
Registry credentials
Private OCI registries also store credentials through the vault. When
a pull gets a 401 Unauthorized, airlock prompts for username and
password, and — if the vault is enabled — saves them keyed by registry
host. Subsequent pulls from the same host reuse the saved creds
without a prompt. With disabled, the pull still works but airlock
re-prompts on every 401.
Tips and tricks
This section collects practical patterns that come up often when working with airlock day-to-day. None of this is required reading, but it can save you some time.
Pairing with mise shows how to use mise as a task runner alongside airlock — installing airlock as a mise tool, building local Docker images for sandboxes, and loading secrets per task.
Docker inside the VM covers two approaches for running Docker containers inside an airlock sandbox: forwarding the host Docker socket (easy but comes with caveats) and running a full Docker engine inside the VM.
Pairing with mise
mise is a polyglot tool manager and task runner. It pairs well with airlock because it gives you a single place to define project tooling, tasks, and environment variables — both on the host and inside the sandbox.
Installing airlock as a mise tool
Since airlock publishes GitHub releases, you can install it directly through mise:
# mise.toml
[tools]
"github:milankinen/airlock" = "latest"
After mise install, the airlock binary is available in your PATH whenever
you’re in the project directory. This makes onboarding straightforward —
new team members run mise install and get both the language toolchain and
the sandbox tool in one step.
Building a local image with Docker
Rather than pulling a generic base image, you can build a project-specific image with a Dockerfile and have airlock use it via the local Docker daemon. This is handy when your sandbox needs tools or system packages that aren’t in the stock image.
Create a Dockerfile at the project root:
FROM debian:trixie-slim

RUN apt-get update && apt-get install -y \
    git curl build-essential
RUN curl https://mise.run | sh
RUN echo 'eval "$(~/.local/bin/mise activate bash)"' >> ~/.bashrc
Then add a mise task to build it:
# mise.toml
[tasks."build:image"]
description = "Build sandbox image"
run = "docker build -t myproject:dev -f dev.dockerfile ."
And point airlock at the local image:
# airlock.toml
[vm]
image = "myproject:dev"
With the default resolution = "auto", airlock checks the local Docker
daemon first and finds your image there — no registry needed. You can
wrap the whole workflow into a single mise task that builds the image and
starts the sandbox:
[tasks.dev]
description = "Build image and start sandbox"
depends = ["build:image"]
raw = true
run = "exec airlock start --login"
Loading secrets per task
airlock’s [env] section can forward host environment variables into the
sandbox using ${VAR} substitution. The question is where those host
variables come from.
mise supports a mise.local.toml file (gitignored by default) where you
can source secrets from a local script or set them directly:
# mise.local.toml — not committed
[env]
_.source = "~/.secrets/project-tokens.sh"
The sourced script can export whatever the sandbox needs:
# ~/.secrets/project-tokens.sh
export CLAUDE_CODE_OAUTH_TOKEN="sk-..."
export INTERNAL_API_KEY="key-..."
These variables are available to every mise task in the project. When a task
starts airlock, the sandbox config picks them up through ${VAR} references:
# airlock.toml
[env]
INTERNAL_API_KEY = "${INTERNAL_API_KEY}"
This keeps secrets out of version control entirely — they live in a local file on each developer’s machine, loaded through mise, and forwarded into the sandbox by airlock.
Vibe coding configuration
Airlock’s configuration system is hierarchical.
That means you can put user-level settings in ~/.airlock/config.toml
or ~/.airlock.toml, and they will apply to every project sandbox by
default (and be overridden by per-project configuration where present).
This is especially handy if you want to “vibe code” and just point your agent at a random directory without any extra setup. Since airlock can build sandboxes from local Docker images, you can prebake one local image with everything you need for your vibe-coding sessions.
Your ~/.airlock/config.toml (or ~/.airlock.toml) might look something
like this:
presets = ["debian", "rust", "claude-code"]

[vm.image]
name = "vibe:local"
resolution = "docker"

[network]
policy = "deny-by-default"
Pairing with mise
If you’re using mise for your project tooling,
airlock pairs extremely well with it. You can use mise’s task
dependencies and sources / outputs to build a local “vibe coding”
image and keep it up to date.
Create ~/.airlock/vibe.dockerfile, for example:
FROM debian:trixie-slim

ENV MISE_TRUSTED_CONFIG_PATHS="/"

# Install development dependencies
RUN apt-get update && apt-get install -y git curl build-essential
RUN curl https://mise.run | sh
RUN curl -fsSL https://claude.ai/install.sh | bash
RUN /root/.local/bin/mise use -g node@22

# Setup login shell
RUN echo 'export PATH=~/.local/bin:~/.cargo/bin:$PATH' >> ~/.bashrc && \
    echo 'eval "$(~/.local/bin/mise activate bash)"' >> ~/.bashrc && \
    echo '[[ -f ~/.bashrc ]] && source ~/.bashrc' >> ~/.bash_profile

ENTRYPOINT ["/bin/bash"]
Then add a user-level task in ~/.config/mise/config.toml:
[tasks."vibe:image"]
description = "Build vibe coding image"
quiet = true
hide = true
dir = "~/.airlock"
sources = ["~/.airlock/vibe.dockerfile"]
run = "docker build -t vibe:local -f vibe.dockerfile ."

[tasks.vibe]
depends = ["vibe:image"]
tools = { "github:milankinen/airlock" = "latest" }
description = "Start my vibe conding sandbox"
quiet = true
raw = true
dir = "{{ cwd }}"
run = "airlock start --monitor"
Running your setup
Now cd into any project directory and run:
mise vibe
Docker inside the VM
There are two ways to get Docker working inside an airlock sandbox: forwarding the host’s Docker socket (quick, but with security trade-offs) or running a Docker engine inside the VM itself (isolated, but more setup).
Option 1: Forward the host Docker socket
The simplest approach is to install only the Docker CLI inside the VM and forward the host’s Docker socket through airlock’s socket forwarding.
On Linux, the socket is typically at /var/run/docker.sock:
# airlock.toml
[network.sockets.docker]
host = "/var/run/docker.sock"
On macOS with Docker Desktop, the socket lives in the user’s home directory,
so use source:target syntax to map it to the standard guest path:
# airlock.local.toml
[network.sockets.docker]
host = "~/.docker/run/docker.sock:/var/run/docker.sock"
The guest path stays the same in both cases — the Docker CLI inside the VM
looks for /var/run/docker.sock regardless of where the host socket is.
With this setup, docker build, docker run, and other commands inside the
sandbox talk to the host Docker daemon. There is nothing else to configure —
the socket relay is transparent.
Security note: this gives processes inside the sandbox full access to the host Docker daemon. A sandboxed process could mount host directories, access host networking, or run privileged containers — effectively escaping the sandbox. This is fine for trusted development workflows but defeats the isolation guarantees if you’re sandboxing untrusted code.
Option 2: Run Docker engine inside the VM
For full isolation, you can run dockerd inside the VM. The airlock kernel
ships with all the necessary support — cgroups v2, overlayfs, netfilter,
namespaces, seccomp — so Docker works out of the box.
There are two things to set up: storage and the daemon process.
Storage
Docker’s overlayfs snapshotter cannot run on top of the VM’s own overlayfs
root filesystem. It needs a regular filesystem, and airlock provides one at
/airlock/disk — a persistent ext4 mount backed by the project’s disk image.
Before starting Docker, bind-mount a subdirectory of /airlock/disk to
/var/lib/docker:
mkdir -p /airlock/disk/docker /var/lib/docker
mount --bind /airlock/disk/docker /var/lib/docker
The data in /airlock/disk persists across sandbox restarts, so your Docker
images and build cache survive reboots.
Starting the daemon
airlock’s VM does not run systemd or any other init system beyond the
lightweight airlockd supervisor. This means dockerd won’t start
automatically — you need to launch it yourself.
The simplest approach is to start it in the background before running your actual command:
dockerd &>/var/log/dockerd.log &
sleep 2  # wait for socket
docker run hello-world
For a more structured setup, you can write a small wrapper script that
starts dockerd and waits for the socket to appear:
#!/bin/bash
# start-docker.sh
mkdir -p /airlock/disk/docker /var/lib/docker
mount --bind /airlock/disk/docker /var/lib/docker

dockerd &>/var/log/dockerd.log &
DOCKERD_PID=$!

# Wait for the socket
for i in $(seq 1 30); do
    [ -S /var/run/docker.sock ] && break
    sleep 0.5
done

if [ ! -S /var/run/docker.sock ]; then
    echo "dockerd failed to start" >&2
    exit 1
fi

exec "$@"
Then use it as your sandbox entry point:
airlock start -- ./start-docker.sh bash
Disabling security hardening
If Docker commands fail with permission errors, you may need to disable
airlock’s security hardening, which restricts namespace creation and
applies no-new-privileges:
[vm]
harden = false
This gives processes inside the container the full set of kernel capabilities they need to create namespaces and manage cgroups.
Container networking
Container egress works on the default Compose bridge — no network_mode: host workarounds needed. airlock’s TCP proxy runs on a TUN device
(airlock0) wired as the VM’s default route, so every outbound packet
ends up in the proxy regardless of which netns it came from. Docker’s
own bridge + MASQUERADE rules pass traffic through unchanged; the
proxy just sees MASQUERADE’d source IPs (the VM’s airlock0 address),
which is fine because airlock keys policy on the destination.
Compose’s service-name DNS works as expected (it’s internal to the
bridge network and never touches airlock’s virtual DNS). Published
ports (ports: ["8000:8000"]) also work via the standard loopback
path: docker-proxy binds the VM’s 127.0.0.1:<port>, and airlock’s
guest = [8000] reverse-forward exposes that on the host.
Experimental: Claude hooks
This integration is experimental. Endpoint paths, payloads, and injected messages may change without notice.
When an airlock network policy denies a connection, the tool inside the sandbox sees a generic failure — a DNS lookup that returns nothing, a TCP connection refused, an HTTPS handshake that never completes. From Claude’s point of view that looks indistinguishable from a flaky endpoint, a typo in a URL, or a transient outage. The usual response is to retry, fall back to a different command, or invent a workaround — anything except telling the user “your sandbox policy blocked this, do you want to allow it?”
The supervisor already knows when it denied a connection. The Claude Code HTTP hooks protocol is the native way to feed that knowledge back into the agent: hooks fire on tool lifecycle events and can inject extra context into the model’s view of the failure. The endpoints below correlate denies with the tool calls that were in flight when they happened, and surface a short explanation to Claude so it can stop and ask instead of retrying blindly.
Endpoints
The in-VM supervisor exposes an HTTP service at http://admin.airlock/
— the hostname resolves to loopback via the guest DNS server, and
loopback traffic bypasses the transparent proxy, so requests land on
the supervisor directly. Three of the admin endpoints implement the
hook protocol:
| Path | Claude hook event | Behavior |
|---|---|---|
/claude/hooks/pre-tool-use | PreToolUse | Record the tool’s start time, keyed by tool_use_id |
/claude/hooks/post-tool-use | PostToolUse | Release the start-time record |
/claude/hooks/post-tool-use-failure | PostToolUseFailure | If any deny was reported since the tool started, inject additionalContext explaining the block |
The correlation is keyed on tool_use_id. The tracker holds up to
1000 in-flight tool calls; if Claude doesn’t fire a post-hook for a
given id the entry is eventually evicted.
Configuration
Add the three hooks to .claude/settings.json (either in your project
or globally in ~/.claude/settings.json):
{
  "hooks": {
    "PreToolUse": [
      {
        "hooks": [
          {
            "type": "http",
            "url": "http://admin.airlock/claude/hooks/pre-tool-use"
          }
        ]
      }
    ],
    "PostToolUse": [
      {
        "hooks": [
          {
            "type": "http",
            "url": "http://admin.airlock/claude/hooks/post-tool-use"
          }
        ]
      }
    ],
    "PostToolUseFailure": [
      {
        "hooks": [
          {
            "type": "http",
            "url": "http://admin.airlock/claude/hooks/post-tool-use-failure"
          }
        ]
      }
    ]
  }
}
Non-2xx responses and connection errors from the admin endpoints are non-blocking — if the supervisor is unreachable for any reason, tool calls proceed as if the hooks weren’t configured.
Advanced usage
This section covers topics that go beyond day-to-day sandbox configuration. Most users won’t need any of this to get productive with airlock, but it’s here when you do.
Network scripting walks through the Lua middleware API for inspecting and modifying HTTP traffic that passes through airlock’s network proxy.
Custom kernel explains when and how to replace the bundled Linux kernel — and what the distroless build variant is for.
Network scripting
Middleware entries under [network.middleware] trigger transparent TLS
interception on matching connections. This gives your Lua scripts access to
the full HTTP request and response, letting you do things like inject
credentials, enforce path-level access control, or rewrite payloads.
If you haven’t read the Network chapter yet, start there — it covers the rule system and policy that middleware builds on.
How it works
Each middleware entry is a named Lua script with target patterns that
determine which connections it applies to. The script receives a req object
representing the intercepted HTTP request.
[network.middleware.add-header]
target = ["api.example.com:443"]
script = '''
req:setHeader("X-Custom", "added-by-airlock")
'''
If the script doesn’t explicitly block or forward the request, airlock forwards it automatically after the script finishes — with any modifications you’ve applied.
Environment variables
Middleware can reference host environment variables through the env table.
Define the mapping in the middleware config:
[network.middleware.api-auth]
target = ["api.example.com:443"]
env.TOKEN = "${MY_API_KEY}"
script = '''
req:setHeader("Authorization", "Bearer " .. env.TOKEN)
'''
The ${VAR} syntax reads from the host environment first and the
secret vault as fallback. If a referenced name resolves
in neither, airlock start aborts with an error — middleware never runs
with silently-missing inputs, so scripts can treat every declared entry
as present.
TLS interception
A per-project CA certificate is automatically generated and installed in the VM’s system trust store the first time you start a sandbox. Processes inside the container see valid certificates for intercepted connections — no manual trust configuration is needed.
All allowed TLS connections are intercepted so requests are visible in the Monitor tab, regardless of whether a middleware script matches. Middleware runs only for connections that match its target; connections with no matching middleware are still MITM-decrypted but pass through unmodified.
Request API
The req object is available in every middleware script:
| Field / Method | Description |
|---|---|
req.method | HTTP method ("GET", "POST", etc.) |
req.path | URL path (readable and writable) |
req.host | Host header |
req.headers | Full headers table (readable and writable) |
req:header(name) | Read a single header value |
req:setHeader(name, value) | Set or overwrite a header |
req:hostMatches(pattern) | Match host against a wildcard pattern |
req:body() | Read the request body (returns a Body object) |
req:setBody(value) | Replace the body (string, table, Body, or nil) |
req:deny() | Block the request with a 403 response |
req:send() | Forward the request and return the response |
log(msg) | Write to the supervisor debug log |
Blocking a request
Call req:deny() to immediately block the request with a 403 response:
if req.path:find("^/admin") then
    req:deny()
end
Forwarding and inspecting the response
Call req:send() to forward the request to the upstream server. This returns
a response object that you can inspect and modify before it reaches the
client:
local res = req:send()
if res.status == 200 then
    log("request succeeded: " .. req.path)
end
If you don’t call req:send() or req:deny(), the request is forwarded
automatically when the script finishes — but you won’t get access to the
response.
Response API
The response object returned by req:send() has a similar interface:
| Field / Method | Description |
|---|---|
res.status | HTTP status code (readable and writable) |
res.headers | Full headers table (readable and writable) |
res:header(name) | Read a single header value |
res:setHeader(name, value) | Set or overwrite a header |
res:body() | Read the response body (returns a Body object) |
res:setBody(value) | Replace the body (string, table, Body, or nil) |
Body objects
Both req:body() and res:body() return a Body object with these methods:
| Method | Description |
|---|---|
body:text() | Raw bytes as a Lua string |
body:json() | Parse as JSON, return a Lua table |
body:len() or #body | Byte length |
When you call req:setBody() or res:setBody() with a Lua table, it’s
serialized as JSON automatically. The Content-Length header is updated to
match the new body size.
Performance note: request and response bodies are streamed lazily by
default. Calling req:body() or res:body() reads the entire body into
memory. For most API traffic this is fine, but be careful with endpoints
that transfer large payloads — a multi-gigabyte upload or download will be
fully materialized in the proxy’s memory and could cause an out-of-memory
crash. If you only need to inspect headers or the request path, avoid
calling body() altogether.
Chaining middleware
Multiple middleware entries with overlapping target patterns all apply to
matching connections. They run in order, and each one sees the modifications
made by the previous:
[network.middleware.add-id]
target = ["api.example.com:443"]
script = '''
req:setHeader("X-Request-ID", "abc123")
'''

[network.middleware.log-id]
target = ["api.example.com:443"]
script = '''
-- this script sees the X-Request-ID header set above
log("request id: " .. req:header("X-Request-ID"))
'''
If any script calls req:deny(), the chain stops and the request is blocked.
Examples
Path-based access control
Allow GitHub API requests only to specific endpoints:
[network.rules.github]
allow = ["api.github.com:443"]

[network.middleware.github-paths]
target = ["api.github.com:443"]
script = '''
local p = req.path
if not (p == "/user" or p:find("^/repos/myorg/")) then
    req:deny()
end
'''
Logging request bodies
[network.middleware.log-posts]
target = ["api.example.com:443"]
script = '''
if req.method == "POST" then
    local b = req:body()
    log("POST " .. req.path .. " (" .. b:len() .. " bytes)")
end
'''
Modifying a response
[network.middleware.sandbox-header]
target = ["api.example.com:443"]
script = '''
local res = req:send()
res:setHeader("X-Sandbox", "true")
'''
Sandbox restrictions
Middleware scripts run in a restricted Lua environment. The following standard
libraries are disabled: os, io, debug, require, load, loadfile,
and dofile. There is no way to access the host filesystem or execute
external processes from a script.
Each request has an instruction limit of 1,000,000 operations. If a script exceeds this limit, the request fails with an error. This prevents runaway scripts from blocking the network proxy.
Custom kernel
By default, the standard (bundled) build of airlock ships with a Linux kernel
and initramfs compiled into the binary. This is the easiest way to get
started — no extra files to manage, and the kernel is known to work with the
airlockd guest supervisor.
For situations where the bundled kernel doesn’t fit — custom drivers, a different kernel version, or a stripped-down build — airlock supports pointing to external kernel and initramfs files.
Configuration
Set the kernel and initramfs fields in the [vm] section:
[vm]
kernel = "/path/to/vmlinux"
initramfs = "/path/to/initramfs.cpio.gz"
Both paths support ~ expansion and are resolved relative to the project
directory. When these are set, airlock uses them instead of the bundled files.
The kernel must be compatible with airlock’s guest supervisor (airlockd).
The repository’s
app/vm-kernel
directory contains the kernel configs used for official builds — these are
a good starting point if you want to compile your own.
Distroless builds
airlock is published in two variants:
- Bundled — includes the Linux kernel and initramfs in the binary. This is the default and recommended variant for most users.
- Distroless — a smaller binary with no bundled kernel or initramfs.
The
vm.kernelandvm.initramfsconfig fields become required.
The distroless variant is useful when you already maintain your own kernel builds, want to minimize binary size, or need a kernel with specific patches or driver support. It’s also the right choice for packaging airlock into environments where bundling a kernel would conflict with the host’s kernel management.
Install the distroless variant with:
curl -fsSL https://raw.githubusercontent.com/milankinen/airlock/main/install.sh | sh -s -- --distroless
Building a kernel
The official kernel build script lives at app/vm-kernel/build.sh in the
repository. It downloads the configured Linux version, applies the airlock
kernel config, and produces a kernel image and initramfs. Both x86_64 and
ARM64 architectures are supported.
If you’re building a custom kernel from scratch, the key requirements are:
- VirtIO drivers (network, block, filesystem, vsock)
- 9p and VirtioFS filesystem support
- ext4 filesystem support
- Overlayfs support
- The init system must be compatible with the
airlockdsupervisor binary that gets packed into the initramfs
Technical implementation
These pages describe how airlock is put together internally — the virtualization layer, the RPC protocol between host and guest, the guest init sequence, how mounts and networking are wired up, and the on-disk layout of sandbox and cache state.
Most users will never need any of this; it’s documented for contributors, people debugging unusual failures, and anyone evaluating the security model in detail.
Overview
airlock runs untrusted code inside a lightweight Linux VM. A single
airlock binary boots a VM, pulls an OCI container image, assembles
an overlayfs rootfs, and gives the user an interactive shell (or runs
a one-off command) inside the container. The VM provides
hardware-level isolation; the container provides a familiar
image-based environment.
One vsock, one RPC connection
The central design decision: the host process and the in-VM supervisor talk over a single vsock connection carrying a single Cap’n Proto RPC session. Every cross-boundary interaction — booting the container, attaching new processes, forwarding stdio, polling stats, bridging outbound TCP, streaming tracing logs — rides that one session.
Cap’n Proto specifically (over gRPC, JSON-RPC, or a bespoke framing): its zero-copy wire format keeps the stdio hot path cheap, it treats remote interfaces as first-class values (the supervisor calls outbound TCP through a capability the host handed it, not through a URL it could fabricate), and concurrent calls and streams are interleaved on one socket without any multiplexing glue of our own. See RPC Protocol / Why Cap’n Proto for the detailed rationale.
This shapes almost everything else:
- No second transport. There is no virtio console for stdio, no
separate vsock port for networking, no control channel for
signals. Cap’n Proto RPC multiplexes many concurrent calls and
streams over the one connection, so a single
read()/write()loop in the supervisor is all the glue the VM needs. - Capabilities as plumbing. Streams like stdin, stdout polling, and outbound TCP are modelled as Cap’n Proto capabilities passed in as arguments. The supervisor doesn’t need the host’s identity or address — it just calls back through the capability it was handed. That means the VM has no egress path of any kind: the only way out is an explicit capability the host chose to grant.
- No daemonless hidden state. There is no airlock daemon on the
host, no shared socket directory, no broker. When the
airlock startprocess dies, the vsock closes, the supervisor exits, and the VM is torn down.airlock execis a thin client that reaches the same session through a Unix-socket bridge in the runningairlock startprocess. - Same wire on every platform. macOS uses host TCP (the Apple
Virtualization framework’s vsock surfaces that way) and Linux uses
real
AF_VSOCK, but the RPC schema and the code paths above it are identical.
The RPC protocol page has the full interface list; the rest of this chapter assumes this one-session model.
Components and channels
The static picture: what runs where, and how the pieces talk.
Channels shown
- vsock · RPC — the single Cap’n Proto RPC connection between the
host
airlock startprocess and the in-VM supervisor. Carries thestartcall (process + mount config + CA), ongoingexeccalls, stats polling, deny notifications, stdio, and theNetworkProxycapability the guest uses to dial out. - cli.sock — Unix-domain Cap’n Proto connection from an
airlock execinvocation to the CLI server embedded in the main process. The server merges override env onto the sandbox’s resolved base env and forwards the call onto the existing vsock. - VirtioFS (not drawn) — each directory/file mount and the
per-layer OCI cache are exported as VirtioFS shares, mounted by
init at
/mnt/<tag>, and bind-mounted into the rootfs. - TUN → TCP proxy (dashed) — all guest TCP egress routes through
airlock0, a TUN device owned by the supervisor. A userspace TCP stack (smoltcp) accepts each flow and dials back throughNetworkProxyon the vsock.
Startup flow
The dynamic picture: which component does which step, left-to-right in time.
Once the container is running, airlock exec reuses the same VM:
the invocation walks up to cli.sock, hands (cmd, args, cwd, env overrides) to the CLI server, which merges the overrides onto the
sandbox’s base env and forwards the call over the existing vsock to
airlockd, which forks a new process inside the container’s chroot.
Virtualization
macOS: Apple Virtualization framework
Uses the native com.apple.Virtualization framework via Rust
bindings (objc2-virtualization). The binary requires two
entitlements and must be ad-hoc codesigned after every build:
com.apple.security.virtualization
com.apple.security.hypervisor
Linux: Cloud Hypervisor + KVM
Uses Cloud Hypervisor with KVM
acceleration. The cloud-hypervisor and
virtiofsd binaries are
embedded in the airlock binary and extracted on first run.
Requires /dev/kvm access; airlock checks and reports permission
issues at startup.
Kernel and initramfs
Kernel and initramfs are built from source and embedded into the
airlock binary via include_bytes!. Shipping them inside the binary
means there are no runtime downloads — one self-contained executable
boots a full Linux VM, which also makes offline use and reproducible
deployments straightforward.
- Kernel: Linux built from source with a minimal config (no
EFI stub — VZLinuxBootLoader and Cloud Hypervisor both require a
raw ARM64
Image). Built inside Docker. - Initramfs: Alpine-based with the
airlockdsupervisor binary and a minimal init script. Built inside Docker as a gzipped cpio archive. - Both are extracted to
~/.cache/airlock/vm/on first run. A checksum check re-extracts them if the binary is updated.
The distroless build variant omits
the embedded kernel and initramfs; the user provides them via
vm.kernel and vm.initramfs in the config.
Virtio devices
| Device | Purpose |
|---|---|
| Serial console | Kernel debug output |
| Entropy | /dev/urandom in guest |
| Memory balloon | Future: reclaim unused guest memory |
| vsock | Host ↔ guest RPC (port 1024) |
| VirtioFS | Shared filesystems (image layers, dir/file mounts) |
| Block (ext4) | Per-project persistent disk |
RPC protocol
CLI and supervisor communicate over a single vsock connection (host TCP on macOS, vsock on Linux) using Cap’n Proto RPC in twoparty transport mode.
Supervisor listens, CLI connects. The CLI polls the vsock port after VM boot until the supervisor is ready. This avoids implementing callback delegates in the host virtualization API.
Why Cap’n Proto
Two properties of Cap’n Proto made it a much better fit for this design than a more conventional IDL (gRPC/protobuf, JSON-RPC, bespoke framing):
- Zero-copy wire format. Messages are already in their in-memory layout when they hit the socket — no parse step, no allocation per field. For the stdio hot path (every keystroke and every chunk of container output crosses the vsock) this matters: there’s no decode tax on top of vsock latency.
- Remote interfaces (capabilities). Cap’n Proto RPC is object-
capability style: an RPC argument can itself be an interface
reference the other side can call back through. airlock leans on
this hard —
Supervisor.start(...)takes aStdincapability and aNetworkProxycapability as arguments, and the supervisor calls methods on them instead of opening its own egress. There’s no URL, no port, no service discovery: the host chose to hand over a specific capability and that’s the only thing the VM can invoke. This is how “the VM has no way out except what the host explicitly grants” is enforced at the protocol level, not by convention. - Built-in pipelining and interleaving. Many concurrent calls
and streaming results share the same connection without any
multiplexing glue of our own. stdio polling, the
Stdinread loop, stats polling, deny notifications, and every outbound TCP proxy session run simultaneously over a single socket. Writing this on top of a request/response RPC would mean reinventing multiplexing.
The combination is why a “single vsock, single session” design is realistic in the first place — and why we don’t need a virtio console, a second vsock port, or any other sidecar transport.
Interfaces (supervisor.capnp)
Supervisor
Boot-time call that carries both the process configuration (replacing
a written config.json) and the mount configuration (replacing a
written mounts.json). A separate exec call attaches extra
processes to the running container.
Supervisor
  start(stdin, pty, network, logs, logFilter,
        epoch, epochNanos, hostPorts, sockets,
        cmd, args, env, cwd, uid, gid, nestedVirt, harden,
        imageId, imageLayers, dirs, files, caches, caCert) → Process
    # Triggers VM init, then forks and execs the container process
    # directly (no crun). `caCert` is the project CA PEM — appended
    # by guest init to the image's CA bundles; empty disables TLS
    # injection.

  exec(stdin, pty, cmd, args, cwd, env) → Process
    # Attach a new process to the running container. Called once per
    # `airlock exec` invocation via the CLI server bridge (below).

  shutdown() → ()
    # Sync filesystems before VM teardown.

  pollStats() → StatsSnapshot
    # CPU/memory/load-average for the Monitor TUI.

  reportDeny(epoch) → ()
    # Host → guest: a network request was denied. The guest caches
    # the timestamp so the admin HTTP service at http://admin.airlock/
    # can correlate it with Claude Code tool failures reported via
    # hook endpoints.
CliService
Exposed by the running airlock start process over
<project>/.airlock/sandbox/cli.sock. airlock exec connects here,
the CLI server merges the sandbox’s resolved base env with any
-e KEY=VAL overrides, and forwards the call to the in-VM
supervisor over the existing vsock.
CliService
  exec(stdin, pty, cmd, args, cwd, env) → Process
Process / Stdin
Process
  poll() → (exit:Int32 | stdout:Data | stderr:Data)
  signal(signum) → ()
  kill() → ()

Stdin
  read() → (stdin:DataFrame | resize:TermSize)
NetworkProxy / LogSink
NetworkProxy
  connect(target, clientSink) → (serverSink | denied)
    # TCP relay: guest connects to target, host bridges to the real
    # destination. `target` is either a TCP `host:port` or a Unix
    # socket guest path.

LogSink
  log(level, message) → stream
    # Guest-side tracing records streamed to the host's run.log.
VM init
Inside the VM, the kernel hands off to a small init in the initramfs
that mounts essential filesystems (/proc, /sys, /dev) and then
launches the supervisor (airlockd). The supervisor’s setup closure
(driven by the first start RPC) does the heavy lifting.
Each stage is a small submodule under airlockd/src/init/linux/;
init/linux.rs is just the ordering glue. The order is
load-bearing — VirtioFS shares must be mounted before the overlay
can reference them, networking must be up before the proxy begins
accepting connections, and container mounts run last so file bind
mounts win over earlier dir bind mounts.
Stages
-
Clock (
clock::set) — the host passes Unix epoch + nanos in thestartRPC; the guest sets the system clock so timestamps are correct from the start. The host re-pushes the wall-clock every minute viaSupervisor.syncClockto correct drift after host sleeps (VMs have no RTC). -
VirtioFS shares (
mount::virtiofs):layers— shared per-layer OCI cache (read-only).- One share per configured directory mount (tag
projectfor the project dir;dir_0,dir_1, … for others). files/rwand/orfiles/ro— only mounted when the config has any file mounts of that kind.
-
Networking (
net::setup) — loopback with10.0.0.1/32for the in-VM DNS server and sysctl tuning. The default route is installed later bytcp_proxy::startonceairlock0(the TUN device) is up. No iptables rules are required. -
Project disk (
disk::setup) — formats the ext4 image if blank (mkfs.ext4), mounts it at/mnt/disk, resizes the filesystem if the disk image was enlarged since the last boot, and bumpsvm.vfs_cache_pressureto200so the kernel reclaims dentry / inode slab more aggressively (the host virtiofs proxy holds an FD open for every cached entry; under airlock’s default RAM allocation natural pressure rarely arrives, so without the bump FDs accumulate into the hundreds of thousands and trip macOS’s per-process limit).The supervisor then spawns a background task that runs every 10 minutes for the lifetime of the VM and does two reclaim steps in sequence:
FITRIMon/mnt/disk— the sparse disk image doesn’t reclaim space on its own as files are deleted; periodic batched discard avoids the per-write tax of mounting withdiscard. ext4 tracks already-trimmed extents so steady-state invocations are near-no-ops.echo 2 > /proc/sys/vm/drop_caches— releases dentry/inode slab without touching the page cache, so file contents aren’t re-fetched from the host (only metadata walks re-stat on next access). This is what actually keeps the virtiofs proxy’s FD count bounded; thevfs_cache_pressurebump alone only changes the relative reclaim weight, which doesn’t help when there’s no pressure to begin with.
Both are best-effort: errors (including hypervisors that don’t pass
VIRTIO_BLK_F_DISCARDthrough) are logged and swallowed. -
Overlay assembly (
overlay::assemble):- CA tmpfs (
ca::prepare_overlay): if thecaCertfield is non-empty, a small tmpfs is created at/mnt/ca-overlaywith a per-distro CA bundle — the image’s own bundle (read from the topmost layer that ships it) with the project CA appended. The tmpfs is then spliced on top of the image lowerdir stack, so the CA is present without writes landing on the persistent upperdir. The raw CA is also dropped at distro anchor paths (/usr/local/share/ca-certificates/airlock.crt, …) so trust-update tools regenerate bundles that still include it. - Lowerdir stack:
/mnt/ca-overlay(when present) →/mnt/layers/<digest>/per image layer, topmost-first. Mounted withuserxattrso overlayfs honors whiteouts encoded by the host-side extractor asuser.overlay.whiteout/user.overlay.opaquexattrs (requires kernel ≥ 5.11). - Upper + work: on the ext4 disk at
/mnt/disk/overlay/rootfsand/mnt/disk/overlay/work. The overlay upper is reset if the stored image ID (.image_idon disk) differs from the one passed instart.
- CA tmpfs (
-
DNS (
net::setup_dns) — writesnameserver 10.0.0.1into the composed rootfs’s/etc/resolv.conf. Queries go to the in-VM network proxy, which resolves them on the host. -
Container mounts (
container::setup) — mountsproc,sys,dev, cgroup2, and applies file bind mounts and cache bind mounts inside the rootfs. Runs after overlay assembly so file bind mounts can override paths inside dir-bind-mounted directories.
The overlay upper layer on disk means writable container state persists across runs. When the base image changes, the stored image ID triggers a full upper reset.
Container execution
Process spawning
The supervisor (airlockd) does not use an OCI runtime. After
assembling the overlayfs rootfs, it spawns container processes
directly via fork + chroot + exec:
- chroot into the assembled overlayfs rootfs.
- uid/gid switched to the container user (read from
startRPC params, derived host-side from the image’s/etc/passwd). - PTY allocated when stdin is a TTY; the host terminal size is sent as the initial PTY dimensions, and resize events (SIGWINCH) are forwarded.
- Pipe mode: when stdin is not a TTY, separate stdout/stderr pipes are used with no PTY.
All process configuration (cmd, args, env, cwd, uid, gid)
is carried in the start RPC call rather than written to a
config.json file.
stdio over RPC
The container process’s stdio doesn’t flow through any virtio console — all three streams are relayed over the same vsock RPC connection that carries control calls. This means the user sees output as fast as the supervisor can read it off the PTY/pipe, and the host terminal’s raw-mode keystrokes and resize events reach the container directly.
Pull-based protocol
Both directions use a pull model:
- CLI → guest (input + resize): the supervisor calls
Stdin.read()on a capability the CLI passed in atstarttime. Each frame is either keyboard data (DataFrame) or a terminal resize (TermSize) — multiplexed on the same stream so a resize can’t race a write to the PTY writer half. - guest → CLI (output + exit): the CLI calls
Process.poll()in a loop and gets back eitherstdoutbytes,stderrbytes, or an exit code. PTY mode collapsesstdout/stderrinto a single stream (the PTY has only one output side); pipe mode keeps them separate.
Pull-based rather than push-based because vsock latency is negligible and pull gives natural backpressure — the guest only sends when somebody is actively reading, and Cap’n Proto RPC handles the multiplexing of many in-flight calls over the single vsock connection.
PTY mode vs pipe mode
The CLI decides mode at startup by checking whether its own stdin is a TTY:
| CLI stdin | Container gets | Streams |
|---|---|---|
| TTY | A PTY (/dev/pts/*) via pty-process | stdout only (PTY merges) |
| not a TTY | Three pipes | stdout + stderr separate |
Pipe mode is what makes echo data \| airlock exec -- grep pattern
and airlock -- sh -c 'echo hi; exit 42' behave like a normal Unix
pipeline — exit codes propagate, stderr doesn’t mix into stdout, and
the CLI doesn’t put the host terminal into raw mode.
In PTY mode the host terminal is put into raw mode, SIGWINCH is
hooked, and the Stdin.read() loop on the CLI side uses
tokio::select! to multiplex terminal reads with resize events into
the single stream the supervisor pulls.
Exit propagation
The supervisor awaits child.wait(), encodes the exit code into the
final Process.poll() frame, and the CLI calls std::process::exit
with that code. When the child is killed by a signal, the signal
number is folded into the exit code using the Unix convention
(128 + signum).
airlock exec — attach to a running container
airlock exec attaches a new process to an already-running container
without rebooting the VM. The flow:
airlock execwalks up from the current working directory looking for.airlock/sandbox/cli.sock. First hit wins — this is how a sibling project directory still finds its running VM when invoked from a subdirectory.- It connects to that socket (Cap’n Proto RPC over a Unix domain
socket) and calls
CliService.exec(cmd, args, cwd, env).envcarries only the-e KEY=VALoverrides the user passed on the command line; no project load, no vault unlock. - The CLI server — running inside the
airlock startprocess, next to the liveVmInstance— merges the overrides onto the sandbox’s resolved base env (image env +airlock.tomlenv resolved once at start) and forwards the call to the in-VM supervisor over the existing vsock. - The supervisor forks a new process inside the container’s chroot
and relays stdio back to the
airlock execterminal through a bridge that translates between the Unix-socket RPC and the vsock RPC.
Why the CLI-server-side env merge
The CLI server sits in the same process that holds the authoritative
VmInstance.env. Doing the merge there means:
airlock execnever loads the project, unlocks the vault, or re-resolves anything — it’s a tiny socket client.- The base env is resolved exactly once, at
airlock start, not once perexec. - Processes attached via
execinherit the same environment the main container process was launched with, which matches the user expectation of “start a shell inside my running sandbox with the same vars”.
Mounts
How VirtioFS shares work
Each mount becomes a VirtioFS share
(one virtio device per share). Guest init mounts each share under
/mnt/<tag>, and the supervisor then bind-mounts from /mnt/<tag>
into the container rootfs after the overlayfs is composed.
The full set of shares present at boot:
| Tag | Host path | Mode |
|---|---|---|
base | ~/.cache/airlock/oci/layers/… | ro |
project | project CWD | rw |
dir_0, dir_1… | each [mounts.*] directory mount | configurable |
files_rw | .airlock/sandbox/overlay/files/rw/ | rw |
files_ro | .airlock/sandbox/overlay/files/ro/ | ro |
files_rw / files_ro are only created when the project has at least
one read-write / read-only file mount.
Project directory
Always mounted at the same absolute path as on the host. This means paths in build tools, error messages, and scripts are identical inside and outside the sandbox. The container shell’s working directory is set to this path.
Directory mounts
A VirtioFS share pointing directly at the host directory. Read-only or
read-write as configured. Dir mounts are sorted by config key and
assigned tags dir_0, dir_1, … so the tag→host mapping is stable
across boots of the same config.
File mounts
File mounts want to expose a single host file at a chosen path inside the container, with writes syncing back to the host. Getting this to work on VirtioFS took a few iterations — the final design has enough moving parts that it’s worth explaining why each piece exists.
Why not VirtioFS file-level bind mounts
The obvious approach — bind-mount the VirtioFS-exposed file directly
at its target path — does not work. stat and ls succeed, but reads
inside the container fail with EACCES regardless of uid, mode, or
capabilities. Directory bind mounts over VirtioFS are fine; file bind
mounts are the broken case. This is a VirtioFS/FUSE limitation, not
something we can fix host-side.
So file mounts need an indirection: the container has to see a directory-level bind mount, and the expected file path has to resolve into it.
Why hard links into a staging directory
Files for a project come from arbitrary locations scattered across the host filesystem. We can’t expose each one as its own VirtioFS share (one virtio device per share burns device slots fast) and we can’t point a single share at many different parent directories.
The fix: one staging directory per mode, and each mount is hard-linked from its source into that staging dir under a unique key:
.airlock/sandbox/overlay/files/rw/
  claude-json      ← hard link to ~/.claude.json
  mise-toml        ← hard link to <project>/mise.toml
Hard links share the inode with the source, so edits made inside the
container appear on the host and vice versa without any copying. The
two staging dirs (rw/ and ro/) get wrapped as the files_rw and
files_ro VirtioFS shares; all file mounts ride a single device each.
If hard-linking fails (cross-filesystem EXDEV — happens when the
project and the sandbox state live on different filesystems, e.g.
project on VirtioFS inside a nested VM, sandbox state on ext4) the
file is copied instead with a warning that sync becomes one-way. This
is unavoidable — a hard link can’t cross filesystem boundaries.
Why symlinks in the upperdir
Each file mount has to appear at its user-chosen target path — e.g.
~/.claude.json or /etc/app/config.json. The container rootfs is a
composed overlayfs with the image layers on the bottom and a persistent
upperdir on the project disk. Before mounting the overlay, guest init
writes a symlink into the upperdir at the target’s relative path:
upper/root/.claude.json  →  /airlock/.files/rw/claude-json
upper/etc/app/config.json →  /airlock/.files/rw/app-config
When the overlay is mounted, the symlink is merged in at its target
path. A read on ~/.claude.json inside the container follows the
symlink to /airlock/.files/rw/claude-json, which is the
directory-level bind mount of /mnt/files_rw — a VirtioFS directory,
where file-level access does work.
The full write path:
container: write ~/.claude.json
  → symlink in overlayfs upperdir
  → /airlock/.files/rw/claude-json           (bind mount)
  → /mnt/files_rw/claude-json                (VirtioFS)
  → overlay/files/rw/claude-json             (host, hard-linked)
  → ~/.claude.json                            (original source inode)
An earlier design used per-file bind mounts applied after the overlay was composed, but that broke whenever a file mount’s target fell under a directory mount — the directory bind mount would cover the file-mount target. Putting the indirection symlinks into the upperdir before any other mount runs means directory mounts can sit on top without hiding file mounts, and file mounts can still target paths inside mounted directories cleanly.
CA certificate injection
The project CA certificate (used for TLS interception) is delivered to
the guest via the caCert field on the start RPC. Guest init builds
a tmpfs lowerdir at /mnt/ca-overlay containing per-distro CA
bundle files with the project CA appended, and splices that tmpfs on
top of the image layers in the overlayfs lowerdir stack:
lowerdir=/mnt/ca-overlay:/mnt/layers/<top-digest>:…:/mnt/layers/<bottom-digest>
Because the CA layer is a tmpfs sitting below the overlay, the injected bytes never land on the persistent upperdir — on the next boot the same injection runs again against the pristine image content, so there’s no accumulation of duplicated cert blocks.
For each known bundle path (Debian/Ubuntu, Alpine, RHEL/Fedora,
openSUSE, Arch), the guest walks the image layers topmost-first, takes
the first non-empty copy of that bundle, appends the project CA, and
writes the result into the tmpfs at the same relative path. If no
layer ships any bundle, the CA is written at
etc/ssl/certs/ca-certificates.crt as a fallback so SSL_CERT_FILE
can point at a predictable location.
The raw CA is also dropped at every well-known anchor directory
(usr/local/share/ca-certificates/airlock.crt, etc.) so distro
trust-update tools (update-ca-certificates, update-ca-trust,
trust extract-compat) regenerate bundles that still include it.
Networking
All outbound network access from the VM goes through a host-side
proxy. There is no route from the VM to the outside world except via
two vsock RPC connections — the kernel is built without a real
egress NIC, and every outbound TCP connection is intercepted by a
userspace TCP/IP stack (smoltcp) running on an in-VM TUN device
(airlock0). The TUN is wired as the VM’s default route, so every
packet that isn’t loopback-local ends up in the proxy regardless of
which netns it originated in (including Docker containers).
The host ↔ guest RPC is split across two vsock ports so bulk network traffic can never head-of-line-block interactive traffic:
SUPERVISOR_PORT— supervisor RPC, pty, logs, stats, daemon control. Everything except network byte relays.NETWORK_PORT—NetworkProxy.connectand its per-connection byte sinks. Independent socket buffers, independentRpcSystem, independent flow control. A slow reader on one never stalls the other.
container socket()/connect(host, port)
  → virtual DNS maps host → synthetic IP in 10.2.0.0/16
  → default route sends packet to airlock0 (TUN device)
  → smoltcp parses the SYN, creates a listener for (dst_ip, dst_port)
  → TCP handshake completes inside smoltcp
  → DNS reverse-lookup maps synthetic IP back to hostname
  → supervisor.NetworkProxy.connect(host:port) over vsock
  → CLI on host resolves host, dials real server (+ optional TLS MITM)
  → bidirectional byte relay (smoltcp socket ↔ RPC sinks)
The TUN-based approach replaced an earlier iptables REDIRECT design.
The fatal flaw of iptables REDIRECT is that the OUTPUT chain only
fires for locally originated traffic. Packets forwarded from a
container netns traverse PREROUTING, not OUTPUT, so they never hit
the rule and never reached the proxy. A TUN at the default route
catches everything — no chain-matching subtleties.
Virtual DNS
The container’s /etc/resolv.conf points at nameserver 10.0.0.1,
which is a minimal UDP DNS server the supervisor runs inside the VM
on loopback. Instead of forwarding queries to the host, the supervisor
allocates a synthetic IP from 10.2.0.0/16 for each hostname and
caches the bidirectional mapping.
This matters because the proxy sees an IP, not a name. When the
container connect()s to the synthetic IP, the packet routes via the
TUN; smoltcp snoops the SYN and creates a listener for that specific
(dst_ip, dst_port). On accept, the proxy reverse-looks up the
synthetic IP in the DNS cache and has the real hostname for policy
evaluation and TLS SNI. This works uniformly for HTTP, HTTPS, and raw
TCP — there is no protocol-specific logic.
Real DNS resolution happens on the host: the synthetic IP never escapes the VM. The CLI gets the hostname, calls the system resolver, and connects to whatever that returns.
Policy evaluation
Once the proxy has (host, port) it asks the CLI whether to allow the
connection. The policy model is:
allow-always(default): skip rules, allow everythingdeny-always: skip rules, deny everything — including port forwards and socket forwardingallow-by-default: allow unless a rule explicitly deniesdeny-by-default: deny unless a rule explicitly allows
When a rule-based policy is in effect, the decision proceeds:
- If any
denypattern matches → block immediately (deny wins). - If any
allowpattern matches → allow. - Otherwise → follow
policy.
Rules are additive across config files and presets; enabled = false
disables a rule (including one inherited from a preset).
Pattern formats (same in allow and deny):
host— exact hostname, any porthost:port— exact hostname and port*:port— any hostname on a specific port*.suffix— subdomain wildcard*— match all (use only for development)
TLS interception
Per-project: a self-signed CA keypair is generated and stored in
.airlock/sandbox/ca.json. The CA cert PEM is passed to the guest via
the start RPC and injected into the rootfs by guest init — see
Mounts / CA certificate injection.
All TLS logic runs in the CLI, not in the supervisor. The in-VM proxy is a pure TCP relay: DNS reverse lookup + raw byte forwarding over vsock. The CLI then:
- Incrementally reads the first bytes of the stream and uses
tls-parserto validate the TLS record header. First byte0x16is not sufficient — any non-TLS stream starting with that byte would false-positive. - If a full ClientHello is recognised, the CLI terminates TLS with a freshly minted cert (signed by the project CA, SNI-matched) and opens a second TLS connection to the real server. Crucially, the CLI negotiates the same ALPN the container negotiated — so an HTTP/2 client talks to an HTTP/2 server, not an h1/h2 mismatch.
- If the stream is not TLS, it’s bridged as raw TCP.
This split (TCP relay in the guest, TLS in the host CLI) exists because an earlier design did MITM inside the supervisor: the container would negotiate h1 with the supervisor while the CLI independently negotiated h2 with the real server, and the raw byte relay between them would hand h1 bytes to an h2 server that rejected them. Moving all TLS to the CLI means one endpoint owns the whole protocol stack and ALPN can be proxied faithfully.
Lua middleware
Middleware is a top-level [network.middleware] section, separate
from rules. Each entry has its own target patterns and a script.
Middleware applies to any allowed connection whose host:port
matches — regardless of which rule allowed it — so the same
middleware can cover traffic from multiple rules without duplication.
Scripts are compiled to bytecode at startup (zero per-request compilation overhead) and run per HTTP request/response. See Network scripting for the scripting API.
Localhost port forwarding
Ports declared as “host ports” in the config get a dedicated
TcpListener bound by the supervisor on 127.0.0.1:<port> before any
user process or daemon starts — so the supervisor always wins the
bind race. On accept, the listener opens a NetworkProxy.connect
call targeted at 127.0.0.1:<port> and relays bytes both ways. No
iptables rules, no SO_ORIGINAL_DST, no shared proxy port: each
listener already knows its port.
Other localhost traffic is unaffected — it stays on lo and reaches
whatever is listening on the VM’s loopback.
Unix socket forwarding
Host Unix sockets are forwarded into the container. When a process in
the container connects to the guest socket path, the supervisor sends
the guest path to the CLI via NetworkProxy.connect(socket=…). The
CLI maps guest path → host path using a pre-built socket_map (with
tilde expansion applied at setup time) and opens a connection to the
host socket.
~ in guest paths is expanded to the container home directory (read
from the image’s /etc/passwd). ~ in host paths is expanded to the
host user’s home directory.
Project layout
Sandbox directory
Each project stores its sandbox state locally in .airlock/ next to
the config file. A .gitignore containing * is written there
automatically so nothing under .airlock/ is tracked by version
control.
<project>/
  airlock.toml                   # user config (tracked by VCS)
  .airlock/
    .gitignore                   # contains "*" — auto-created
    airlock.log                  # tracing log from the last run
    sandbox/
      ca.json                    # CA cert + key PEMs (single JSON file)
      overlay/
        files/rw/{key}           # hard-linked writable file mounts
        files/ro/{key}           # hard-linked read-only file mounts
      disk.img                   # virtio-blk ext4 volume
      run.json                   # last-run timestamp, guest_cwd
      run.log                    # tracing log from the last run
      lock                       # PID lockfile (one VM per project)
      cli.sock                   # Unix socket for `airlock exec` RPC
      image                      # hard link to images/<digest> JSON
airlock rm removes the entire .airlock/ directory. The config
file is untouched.
The CA is a single file — there is no longer a sandbox/ca/
directory. The PEM bytes read from ca.json are passed to the guest
via the start RPC and the guest injects them after mounting
overlayfs (see Mounts / CA certificate injection).
CA keypair
On first airlock start, a self-signed CA keypair is generated and
written to sandbox/ca.json as a JSON object with cert and key
PEM fields. The PEM strings are read into memory once and kept on the
Project struct — no further file reads are needed at TLS setup or
guest CA injection.
Global cache
~/.cache/airlock/
  vm/
    Image                        # Linux kernel (extracted on first run)
    initramfs.gz                 # initramfs
    cloud-hypervisor             # (Linux only) hypervisor binary
    virtiofsd                    # (Linux only) VirtioFS daemon
    checksum                     # triggers re-extraction after binary update
  oci/
    images/<digest>              # schema-tagged JSON: the fully-baked OciImage
    layers/<digest>/             # extracted layer tree (whiteouts as xattrs)
    layers/<digest>.download.tmp # in-flight download (swept on next run)
    layers/<digest>.download     # complete tarball pending extraction
    layers/<digest>.tmp/         # in-flight extraction (swept on next run)
The image cache is shared across all projects. Layers are
content-addressable by digest, so two images that share a base layer
extract it only once. Platform is fixed to linux/arm64 (matching
the VM architecture).
Each images/<digest> entry is a single JSON file carrying the
serialized OciImage (wrapped in a {"schema":"v1", …} envelope for
forward-compatible schema evolution). It is written atomically via
.tmp rename and then hard-linked into the sandbox at
sandbox/image; a link count greater than 1 on the cached file means
at least one sandbox references the image, which prevents GC.
A <digest>/ layer directory only exists through the atomic rename
from <digest>.tmp/, so its presence is itself the completion marker
— no separate .ok file is needed.
sandbox/image serves two purposes: it’s the per-project GC
ref, and it’s the stored-image source — reading it as JSON gives the
full cached OciImage, including the digest used to detect image
changes across runs. When the digest changes the overlay upper layer
is reset.
Locking
sandbox/lock contains the running PID. If the lock file exists and
the PID is alive, airlock start refuses to start (one VM per
project at a time). Stale locks (dead PID) are silently cleared.